Joanne Moore
-
Posts
16 -
Joined
-
Last visited
Content Type
Profiles
Forums
Store
Blogs
Events
Everything posted by Joanne Moore
-
This tutorial shows how to change the Administrator password to your own on Windows Server 2012, 2016,2019 and 2022. This tutorial can also be used to change other user passwords that are already created on your Windows server. Preliminary Requirements Windows-based server with one of the following operating systems: Windows Server 2012, 2016,2019 or 2022. Log in to your Windows Server Log in to your Windows Server 2012 or 2016 via Remote Desktop. If you do not know how to do it, see the tutorial here. Changing the password 1. Press on the "Start" button and select "Administrative Tools". (For Windows Server 2016 and 2019 select "Windows Administrative Tools"). 2. Double press "Computer Management". 3. Expand "Local Users and Groups". 4. Select "Users" and right-click on "Administrator". 5. Choose "Set Password..." and click "Proceed". 6. Type the new password two times and click "OK". If everything is fine you will see a message "The password has been set." From now on, a new "Administrator" password will need to be used.
-
Want to connect to VPS Windows server using RDP and are not sure how to do so correctly? Follow the steps of this tutorial exactly as they are provided and you should have no problem. What Is RDP? First, if by any chance any of you are not aware, let’s find out what exactly RDP is. Remote Desktop Protocol (RDP) - is a protocol created by Microsoft Corporation, which provides a graphical interface for a user. RDP client is available in most operating systems. By default, RDP uses 3389 TCP port. Remote Desktop Connection is the official program meant to be used for login via RDP. Requirements To be able to follow these instructions you must have a VPS Windows server with Windows 2012 or 2016 R2 OS. Login Via Windows Computer The following steps are meant for Windows operating system users. 1. Open up your "Remote Desktop Connection" program and select "Show Options". 2. Enter your login credentials and press "Connect": Computer: Your_server_IP Username: Administrator 3. Then, enter your server's password and press the "OK" button Login Via Linux OS If you are a Linux OS user and do not have a rdesktop installed yet, you can install it with the command provided below. For Ubuntu/Debian you must use: apt-get update apt-get install rdesktop CentOS/Fedora users should execute these commands: yum update yum install rdesktop Then you should be able to login to your Windows 2008 or 2012 R2 server using this command in the terminal: rdesktop -u Administrator -p PASSWORD -g 1280x720 YOUR_SERVER_IP If you have followed these steps closely and have done everything correctly, VPS Windows Server window should open up: If you have any comments or questions after reading this tutorial, do not hesitate to leave us a comment or contact our 24/7 customer support. We hope our steps on connecting to the Windows server using RDP were useful and hope to see you again soon. We are always happy to hear from you and will gladly help with any issues related to our products and services.
-
Here is a simple, straightforward guide to improving VPS security. Change the SSH port One of the most common points of attack is port 22. Changing this discourages many of them as well as scripts set to check for that port. In order to change the port do the following: nano /etc/ssh/sshd_config You should locate a line that looks like: #Port 22 Un-comment this line and change the port number. A port number above 1024 is recommended. This section of your sshd_conf should now look like: Port 2222 #AddressFamily any #ListenAddress 0.0.0.0 #ListenAddress :: You can now save and exit nano (Ctrl x) and restart the SSHD service by issuing the following command: service sshd restart IMPORTANT: Make sure you can connect to SSH using the new port. Leave your current SSH session open and open a new session using the new port you set above. If you can connect to the new SSH session on the new port than everything is good. If you cannot, then you need to figure out why. This is why you left the original SSH session open, otherwise, you would be locked out of your server. You may need to add the new port in your IPTables. First, open your IPtables rules: nano /etc/sysconfig/iptables Next, locate the COMMIT line and add the following above it making sure to change #### to the port you set for SSH: iptables -A INPUT -m state --state NEW -m tcp -p tcp --dport #### -j ACCEPT You can now save and exit nano (Ctrl x) and restart the IPtables service: service iptables restart You should now try to connect to SSH again. If you still cannot connect to it, it would be best to set your SSH port back to 22 and contact your service provider for help. Use strong passwords for everything One of the most common causes of system breach is weak passwords. For a strong password, follow a few simple guidelines: • Minimum password length should be 10 characters • Always use a mix of numbers, letters, uppercase, lowercase, and symbols (when allowed) • Strong Password Example- T=ep@Uy*ST If you need to change your root password, issue the following command and follow the prompts: passwd Disable Root User It is a security risk to keep the root user enabled. Most operations and installs should not be done using root. Instead, create a regular user and if you need root privileges, use the su command. To add a user, do the following replacing “namehere” with your desired username: useradd namehere passwd namehere Now, disable root login to SSH by editing your sshd_config file: nano /etc/ssh/sshd_config PermitRootLogin no (make sure you remove the #) Now save and exit Nano (Ctrl x) and restart SSHd: service sshd restart For your next connection, use the previously created “namehere” user and if needed to perform root commands, simply use the “su” command followed with the root password. Restrict SSH access by IP using IPtables This adds a great amount of security but make sure you have a static IP. First, open your IPtables rules: nano /etc/sysconfig/iptables Locate the line containing rule with "--dport 22" fragment and add the following above it making sure to change #### to the port you set for SSH and 192.168.0.1 to your IP address: -A INPUT -p tcp -s 192.168.0.1 --dport #### -j ACCEPT You can now save and exit nano (Ctrl x) and restart the iptables service: service iptables restart Install RkHunter Every server needs something checking for rootkits, backdoors, md5 hashes (file changes), hidden files, etc.. etc.. and RKHunter is great at this. To install RKHunter, issue the following commands: yum install rkhunter -y You need to set up a daily cron so that rkhunter will check its version and update it if needed as well as run a scan. We will also be setting it so it will e-mail you the daily report. Create and open in nano a new cron task/shell script by issuing the command below: nano -w /etc/cron.daily/rkhunter.sh Now add the following making sure to replace “PutYourServerNameHere” with your server's hostname and “your@email.here” with your email address: #!/bin/sh(/usr/local/bin/rkhunter --versioncheck/usr/local/bin/rkhunter --update/usr/local/bin/rkhunter --cronjob --report-warnings-only) /bin/mail -s 'rkhunter Daily Run (PutYourServerNameHere)' your@email.here If you don’t know your server’s hostname, you can find it by typing hostname in your ssh window. You will need to exit (Ctrl x) nano first or open another session. You also need to secure the script making it usable only by root. To do this, issue the following command: chmod 700 /etc/cron.daily/rkhunter.sh Now test it and make sure it runs ok. To run rkhunter manually, issue the following command: rkhunter -c -sk That’s it. You're done and your server just became much safer! Install CSF (Config Server Firewall) CSF includes many different types of protection and is much more user-friendly than using IPTables directly. If you are not sure whether you have Perl installed issue the following command: perl -v If perl is installed, it will return which version. If it is not installed, issue the following command to install it: yum install perl-libwww-perl.noarch perl-LWP-Protocol-https.noarch perl-GDGraphyum install perl perl-libwww-perl perl-Time-HiRes -y Now you can install CSF with the command below: cd /usr/src rm -fv csf.tgz wget https://download.configserver.com/csf.tgz tar -xzf csf.tgz cd csf sh install.sh Make sure that you have the required iptable modules by issuing the following command: perl /etc/csf/csftest.pl It is possible that you will be missing some modules, but as long as the test does not return a fatal error, you should be fine. You may lose some functionality of CSF with missing modules but it will work. When you install CSF, it automatically whitelists your IP. It also starts in test mode which means it clears the rules every 5 minutes. Make sure you leave it in test mode until you are sure your configuration is working properly. If you do lock yourself out, just wait for 5 minutes and you will be able to log in again. The stock configuration is fine for most servers though some changes should be made. If you changed your SSH port above, you need to make sure to add it to your CSF config. To edit the csf configuration, issue the following command: nano /etc/csf/csf.conf The first thing to edit is the TCP ports. You can delete port 22 on inbound and outbound since SSH uses your new port which should already have been added to the end of the inbound line, if not then add it. You will also need to add it to the outbound TCP: # Allow incoming TCP portsTCP_IN = "20,21,25,53,80,110,143,443,465,587,993,995,####" # Allow outgoing TCP portsTCP_OUT = "20,21,22,25,53,80,110,113,443,####" Next, locate CONNLIMIT = “” You should limit the number of concurrent connections per IP on the most commonly attacked ports which are 21 (FTP), 80 (HTTP), and your new SSH port. This setting is only for TCP. CONNLIMIT = "21;5,####;5,80;20" Next, configure port flood protection located directly under CONNLIMIT. Again, you should add the most commonly attacked ports. This setting limits the number of connections allowed at one time on a specified port. PORTFLOOD = "21;tcp;5;300,80;tcp;20;5,####;tcp;5;300" To set the e-mail that CSF will send reports to, find X_ARF_TO = “” and add your email address: X_ARF_TO = "your@email.here" That’s all the configuration changes we are going to cover in this guide. Save and exit your editor (Ctrl x) and start CSF by issuing the following command: csf -h (shows a list of csf commands) or csf -s (starts csf) You need to open another SSH session and try to connect to your server. If you can connect without error your configuration is good! Now we can disable testing mode so the lfd (login failure daemon) will be able to start. To do this, go back into your csf.conf /etc/csf/csf.conf and find TESTING = “1″ and change it to “0″ then save and exit (Ctrl x). Restart CSF with the following command: csf -r Now you should remove the install archive by issuing the following command: cd ../rm -fv csf.tgz That's it! Now your server is more secure.
-
Introduction Encryption is the process of encoding files in such a way that only those who are authorized can access it. Encryption does not of itself prevent interception but denies the file content to the interceptor. In an encryption scheme, the intended files, referred to as plaintext, is encrypted using an encryption algorithm, generating ciphertext that can only be read if decrypted. Linux distribution provides a few standard encryption/decryption tools that can prove to be handy at times. Here in this article, we have covered 3 such tools with proper standard examples, which will help you to encrypt, decrypt and password-protect your files. 1. GnuPG GnuPG (GNU Privacy Guard, often called GPG) package in most of today’s Linux distributions comes by default, if in-case it’s not installed you may apt or yum it from the repository. Ubuntu/Debian: sudo apt-get install gnupg CentOS/Fedora: yum install gnupg Encrypting Now you can encrypt a file using GPG. As soon as you run the gpg command with option -c (encryption only with symmetric cipher) it will create a file testfile.txt.gpg. gpg -c /path_to_the_file/testfile.txt Note: Enter Paraphrase twice to encrypt the given file. The above encryption was done with CAST5 encryption algorithm automatically. You may specify a different algorithm optionally. To see all the encryption algorithm present you may execute: gpg --version Decrypting Now, if you want to decrypt the above encrypted file, you may use the following command: gpg /path_to_the_file/testfile.txt.gpg Note: You need to provide the same password you gave at encryption to decrypt when prompted. More information about GNU Privacy Guard on official site: https://www.gnupg.org 2. Zip It is one of the most famous archive formats and it is so much famous that we generally call archive files as zip files in day-to-day communication. It uses pkzip stream cipher algorithm. If you have not installed zip you can do it with apt or yum. Ubuntu/Debian: sudo apt-get install zip CentOS/Fedora: yum install zip Encrypting Create an encrypted zip file using zip: zip --password mypassword testarchive.zip testfile.txt Or if you want to add more files into zip archive: zip --password mypassword testarchive.zip testfile.txt testfile1.txt testfile2.txt Note: Here mypassword is the password used to encrypt it. Decrypting To decrypt the file, you will need to install unzip: Ubuntu/Debian: sudo apt-get install unzip CentOS/Fedora: yum install unzip Decrypt the password-protected zipped file using unzip: unzip testarchive.zip You need to provide the same password you provided at encryption. 3. OpenSSL By default OpenSSL is installed in all our templates, however, if you have removed it you can install it with apt-get or yum. Ubuntu/Debian: sudo apt-get install openssl CentOS/Fedora: yum install openssl Encrypting openssl enc -aes-256-cbc -in /path_to_the_file/testfile.txt -out /path_to_the_file/testfile.dat Explanation of each option used in the above command. enc encryption -aes-256-cbc the algorithm to be used. -in full path of a file to be encrypted. -out the full path where it will be decrypted. Decrypting Decrypt a file using OpenSSL: openssl enc -aes-256-cbc -d -in /path_to_the_file/testfile.dat > /path_to_the_file/testfile2.txt

-
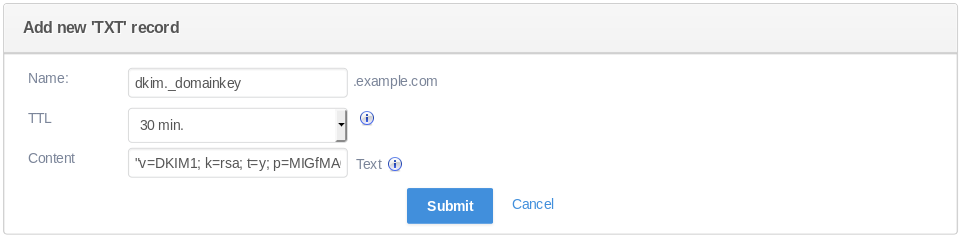
Introduction SPF (Sender Policy Framework) is a DNS text entry which shows a list of servers that should be considered allowed to send mail for a specific domain. Incidentally, the fact that SPF is a DNS entry can also considered a way to enforce the fact that the list is authoritative for the domain, since the owners/administrators are the only people allowed to add/change that main domain zone. upon receipt, the HELO message and the sender address are fetched by the receiving mail server the receiving mail server runs a TXT DNS query against the claimed domain SPF entry the SPF entry data is then used to verify the sender server in case the check fails a rejection message is given to the sender server DKIM (DomainKeys Identified Mail) should be instead considered a method to verify that the messages' content are trustworthy, meaning that they weren't changed from the moment the a message left the initial mail server. This additional layer of trustability is achieved by an implementation of the standard public/private key signing process. Once again the owners of the domain add a DNS entry with the public DKIM key which will be used by receivers to verify that the message DKIM signature is correct, while on the sender side the server will sign the entitled mail messages with the corresponding private key. when sending an outgoing message, the last server within the domain infrastructure checks against its internal settings if the domain used in the "From:" header is included in its "signing table". If not the process stops here a new header, called "DKIM-Signature", is added to the mail message by using the private part of the key on the message content from here on the message *main* content cannot be modified otherwise the DKIM header won't match anymore upon reception, the receiving server will make a TXT DNS query to retrieve the key used in the DKIM-Signature field the DKIM header check result can be then used when deciding if a message is fraudulent or trustworthy Setting Up SPF SPF requires only that you add a TXT record to your DNS zone for the domain. How that happens depends on the tools provided by your domain registrar, or the tools you set up yourself should you manage your own nameservers. If using a registrar's web interface to make DNS changes, you may or may not have the option to enter a subdomain for the record. If you do, then leave that field blank. This generic SPF TXT record authorizes mail originating from mail servers for your domain that is identified by MX records and all other servers associated with your domain that have A records: "v=spf1 a mx -all" Note that the double quotes are a necessary part of the SPF TXT record. Much more complicated records than this are possible, as outlined in the SPF documentation. Setting Up DKIM Setting up DKIM is a little more involved than SPF, but still not too challenging if you are already running a Postfix mail server on Ubuntu. First, install the necessary packages: apt-get install opendkim opendkim-tools -y Open /etc/opendkim.conf: nano /etc/opendkim.conf Add the following: Domain your_domain KeyFile /etc/postfix/dkim.key Selector dkim SOCKET inet:8891@localhost Open /etc/default/opendkim: nano /etc/default/opendkim Add the following: SOCKET="inet:8891@localhost" Configure postfix to use this milter: nano /etc/postfix/main.cf Make sure that these two lines are present in the Postfix config file and are not commented out: milter_protocol = 2 milter_default_action = accept It is likely that a filter (SpamAssasin, Clamav etc.) is already used by Postfix; if the following parameters are present, just append the opendkim milter to them (milters are separated by a comma), the port number should be the same as in opendkim.conf: smtpd_milters = unix:/spamass/spamass.sock, inet:localhost:8891 non_smtpd_milters = unix:/spamass/spamass.sock, inet:localhost:8891 If the parameters are missing, define them as follows: smtpd_milters = inet:localhost:8891 non_smtpd_milters = inet:localhost:8891 Generating the Public and Private Keys Now you can generate a private key for signing outgoing mail. Note that in the following command, "dkim" is the value given to Selector in /etc/opendkim.conf. This can be any simple string, provided you are consistent about replacing "dkim" with your desired value everywhere in this recipe. Run the following command to generate the key and associated materials in the form of two files, dkim.private, and dkim.txt. The former is the RSA private key, while the latter contains the entry you will have to place into your DNS records. opendkim-genkey -t -s dkim -d your_domain Move the key into place, but don't forget to take a copy and keep that copy backed up somewhere safe: mv dkim.private /etc/postfix/dkim.key You'll need to restart Postfix and OpenDKIM services to pick up the configuration changes so that outgoing mail is signed using DKIM: service opendkim start service postfix restart Adding the Public Key to The Domain's DNS Records Next up is the DNS record setup. How you do this is again completely dependent on how you manage DNS or how it is managed for you - everyone's tools are different. Note that some registrars do not let you create raw TXT records with specific subdomains, which will prevent you from creating DKIM TXT records. If this is the case, then you will have to transfer your domain to a real registrar that lets you play with all the toys. Or you can simply use our DNS management system! You can find information about your public key in dkim.txt file: cat dkim.txt Here is how it looks on our DNS management system: Sharing a DKIM Key for Multiple Domains If you are serving multiple domains from the same mail server, then the contents of /etc/opendkim.conf: nano /etc/opendkim.conf Instead of: Domain your_domain KeyFile /etc/postfix/dkim.key Selector dkim SOCKET inet:8891@localhost Should be: Domain * KeyFile /etc/postfix/dkim.key Selector dkim SOCKET inet:8891@localhost Testing First of all, give the DNS changes a chance to propagate before using it. Decent testing service is Mail Tester.
-
Lynis is an open-source security auditing tool. Used by system administrators, security professionals, and auditors, to evaluate the security defenses of their Linux and UNIX-based systems. It runs on the host itself, so it performs more extensive security scans than vulnerability scanners. ClamAV is an open-source (GPL) anti-virus engine used in a variety of situations including email scanning, web scanning, and endpoint security. It provides a number of utilities including a flexible and scalable multi-threaded daemon, a command-line scanner and an advanced tool for automatic database updates. 0. Preliminary requirements: "CentOS 7" template installed on the server; "nano" text editor installed (yum install nano -y). 1. Installation of Lynis mkdir /usr/local/lynis cd /usr/local/lynis wget https://downloads.cisofy.com/lynis/lynis-2.7.5.tar.gz tar -xvf lynis-2.7.5.tar.gz The newest version can be found at: https://cisofy.com/download/lynis/ 2. Using Lynis To execute Lynis we first have to move to its folder: cd /usr/local/lynis/lynis In order to see Lynis tutorial execute: ./lynis To check entire VPS execute: ./lynis --check-all 1. Installation of ClamAV yum install epel-release yum update yum install clamav-server clamav-data clamav-update clamav-filesystem clamav clamav-scanner-systemd clamav-devel clamav-lib clamav-server-systemd 2. Enabling Freshclam Freshclam will keep ClamAV up-to-date. In this tutorial, it is set to check 4 times a day for new files. cp /etc/freshclam.conf /etc/freshclam.conf.bak sed -i '/Example/d' /etc/freshclam.conf Edit "clam-freshclam.service" file: nano /usr/lib/systemd/system/clam-freshclam.service And paste the content: Enabling freshclam to start automatically: systemctl enable clam-freshclam.service systemctl start clam-freshclam.service To manually update ClamAV virus database use the following command: freshclam 3. Configuring ClamAV deamon cp /usr/share/clamav/template/clamd.conf /etc/clamd.d/clamd.conf sed -i '/Example/d' /etc/clamd.d/clamd.conf mv /usr/lib/systemd/system/clamd@.service /usr/lib/systemd/system/clamd.service Now we have to change the clamd service file: nano /usr/lib/systemd/system/clamd.service Now move to "system" directory: cd /usr/lib/systemd/system And enable clamd to start automatically: systemctl enable clamd.service systemctl start clamd.service 4. Manual scan options To scan all files on the VPS and show name of each file: clamscan -r / To scan all files on the VPS, but only show names of infected files when found: clamscan -r -i / To scan all files on the VPS, but only show names of infected files, while scan running in the background (while in progress, you can check the scan with "jobs" command): clamscan -r -i / & To scan all files in all users home directories: clamscan -r /home To scan all files in the USER directory and move infected files to different Quarantine directory: clamscan -r --move=/home/USER/Quarantine /home/USER To scan all files in the USER directory and delete the infected files: clamscan -r --remove /home/USER
-
Introduction MongoDB is a free and open-source NoSQL document database used commonly in modern web applications. This tutorial will help you set up MongoDB on your server for a production application environment. To follow this tutorial, you will need A sudo non-root user, which you can set up by following this: Create new user: adduser name_of_new_user To add "sudo" privileges to our new user, we need to add the new user to the "sudo" group. By default, on Ubuntu/Debian, users who belong to the "sudo" group are allowed to use the sudo command. Run this command to add your new user to the sudo group: gpasswd -a name_of_new_user sudo Then login as new user, just execute: su name_of_new_user Importing the Public Key In this step, we will import the MongoDB GPG public key. MongoDB is already included in Ubuntu package repositories, but the official MongoDB repository provides most up-to-date version and is the recommended way of installing the software. Ubuntu ensures the authenticity of software packages by verifying that they are signed with GPG keys, so we first have to import they key for the official MongoDB repository. To do so, execute: sudo apt-key adv --keyserver hkp://keyserver.ubuntu.com:80 --recv 7F0CEB10 Creating a List File Next, we have to add the MongoDB repository details so APT will know where to download the packages from. Issue the following command to create a list file for MongoDB: echo "deb http://repo.mongodb.org/apt/ubuntu "$(lsb_release -sc)"/mongodb-org/3.0 multiverse" | sudo tee /etc/apt/sources.list.d/mongodb-org-3.0.list After adding the repository details, we need to update the packages list. sudo apt-get update Installing and Verifying MongoDB Now we can install the MongoDB package itself. sudo apt-get install -y mongodb-org This command will install several packages containing latest stable version of MongoDB along with helpful management tools for the MongoDB server. After package installation MongoDB will be automatically started. You can check this by running the following command. sudo service mongod status If MongoDB is running, you'll see an output like this (with a different process ID). Output mongod start/running, process 16791 You can also stop, start, and restart MongoDB using the service command (e.g. service mongod stop, service mongod start).
-
To install OpenVPN AS software in CentOS / Debian operating systems, perform the steps below. Update your VPS Before any new software installation, ensure that VPS operating system has latest software packages. Use this command in SSH: For CentOS: yum update -y For Debian: apt-get update Setup OpenVPN software The process is very simple and straightforward: CentOS 6: wget http://swupdate.openvpn.org/as/openvpn-as-2.0.10-CentOS6.x86_64.rpm CentOS 7: wget http://swupdate.openvpn.org/as/openvpn-as-2.0.10-CentOS7.x86_64.rpm Debian 6: wget http://swupdate.openvpn.org/as/openvpn-as-2.0.10-Debian6.amd_64.deb Debian 7: wget http://swupdate.openvpn.org/as/openvpn-as-2.0.10-Debian7.amd_64.deb Install OpenVPN: For CentOS: rpm -ivh openvpn-[details].rpm For Debian: dpkg -i DEB_PACKAGE That's it! Read post install message in SSH for login details / instructions.
-
The most common issue in Windows Server is C drive running out of space and getting full, so there is not enough free space to install critical Windows update, applications and etc. If the server's C drive becomes full, some Windows services might stop working, the server may reboot unexpectedly, or even crash. Furthermore, if your disk usage is almost full or full, you might not be able to access your VPS via RDP. However, you can activate Emergency Console and access your server through Console or VNC. You can check here how to do that. To solve an issue, firstly you can start freeing up disk space in your server. You can do that by reclaiming disk space or increasing free space in the C drive. if you decide that you need to increase your disk size, you can simply upgrade your server plan to a bigger plan. However, if you decide that the current plan resource limits are enough for you, you can simply reclaim disk space. So in this article, I’ll show you how to free up disk space in Windows Server. Temporary Files By starting freeing up space in the Windows server, you can delete temporary files. Temporary files (temp files) are those files that your operating system only needed to exist temporarily while in use but are now just wasting space. These files are stored in the Windows Temp folder. These files from this folder can be deleted manually or automatically and there are various ways to do that. So down below will be provided some ways how to do that. Go to Windows Settings; Once there, go to System; You must click on Storage; Then click on This PC (C:) and then Temporary Files. The wizard will show the files ready to be deleted. Just select a group and finally click on Remove Files. Disk Cleanup Open Windows Explorer, right-click C drive; Select Properties; Click Disk Cleanup. You may also click the option to compress this drive to save disk space; Then click the check-box in front of the files you want to clean from your VPS and click OK (5) and confirm this operation. Also, there are more ways how to free up disk in Windows, for example, uninstall unused programs, delete unnecessary files and etc. The chosen way depends on how much disk space you need to free up and the ability to do that.
-
In this article we will explain how to install IIS (Internet Information Services) on our Windows VPS servers and host your first website. In order to do so you have to have a Windows VPS server (any version of 2008 or 2012 is fine) and be connected to it. Installing IIS to your server. 1. Open a Server Manager and choose Dashboard on the left (1st picture); 2. Press Add roles and features; 3. Press Next; 4. Choose Role-based or feature-based installation and press Next; 5. Choose Select a server from the server pool and press Next; 6. From the list, mark the check-box at the Web Server (IIS) and press Next (2nd picture); 7. The next list provides you with some more feature, you should only choose them if you need and then press Next; 8. Press Install and after it finishes press Close. 1. Server Manager 2. Choosing to install Werb Server IIS You have successfully installed IIS to your server. Now you may start hosting your first website with it. Open IIS Interface: 1. Open Control Panel; 2. Choose Administrative Tools; 3. Choose Internet Information Services (IIS) Manager (3rd picture). 3. Selecting IIS service Adding new website: 1. Right click on Sites and choose Add Website; 2. Fill the form as following a) Site name: your website name; b) Physical path: You should create and choose a folder which will have your website files; c) Type: depends on your website it can be http or https; d) IP address: by default it is All unassigned, however we would recommend to choose your server IP; e) Port: we would recommend using default port - 80; f) Host name: you should enter your website for example: time4vps.giedrius.com; g) When you entered all the information just press OK. When you do all the following steps, you may check your website, but it should not be online by default. This is because your server needs additional configuration. Server configuration: Open server command line and enter the following commands: netsh http add iplisten ipaddress=X.X.X.X exit iisreset Where "X.X.X.X" your should enter your server's IP address. Check out the example in the picture. 4. Command line You are all set, you may check your website online.
-
In this article we will provide the instruction on how to set up and configure your FTP server on your Windows Server. We will be using FileZilla Server software: Download and installation of FileZilla FTP Server software First you need to download the installation file of FileZilla Server, it can be done from the official site: https://filezilla-project.org/download.php?type=server Once you download the installation file, execute it so get to installation wizard. In the first step you will have to simply press "Next" to continue installation. Then you will have to simply check box some option, which we recommend keeping as suggested by default, unless you are sure you want to make changes. Below you can see the example of this windows: Once you press "Next", you will be presented with the window, where you will have to choose to location of the FileZilla Server installation and then press "Next" again. After this, you will be present with other window, to choose how will your FileZilla server should be started (Automatically, Manually, or as regular software). Example shown below: Once you proceed to the next step, you will have to choose on what occasions the FileZilla Server interface should be opened: Once this is done, finish the installation and the FileZilla interface should pop-up automatically and you will see the following window: In this window, you should leave the default option, it will mean that your FTP server will work on localhost, which you are configuring right now. The main interface looks very simple and provide the necessary options: Adding users for FTP Server Once you enter the main interface, you will need to create users, which will be able to connect to your FTP Server, this can be done by pressing Edit > Users in the top menu. Once you press this, you will be displayed with the settings as below: In this print-screen you can see a button "Add", which you will press in order to create a User. After this, you will have to assign a shareable folder, which your created user will be able to access, as well as the privileges (Read, Write, Delete and etc.), this can be done by choosing "Shared folders" on the left side: Alright, you have set up your FTP server and created user, which will be able to log int to your FTP Server and specific folders. Windows Firewall changes Since Windows Server is probably blocking everything, in order for your FTP Server to work correctly, you will have to allow the FileZilla Server software withing your Windows Firewall (Inbound and Outbound connections). Be sure not to forget the firewall changes, otherwise your users may not connect to the server. More information about the software and advanced configuration can be found on FileZilla community forum: https://forum.filezilla-project.org/