
Chris Luke
Administrators
-
Joined
-
Last visited
-
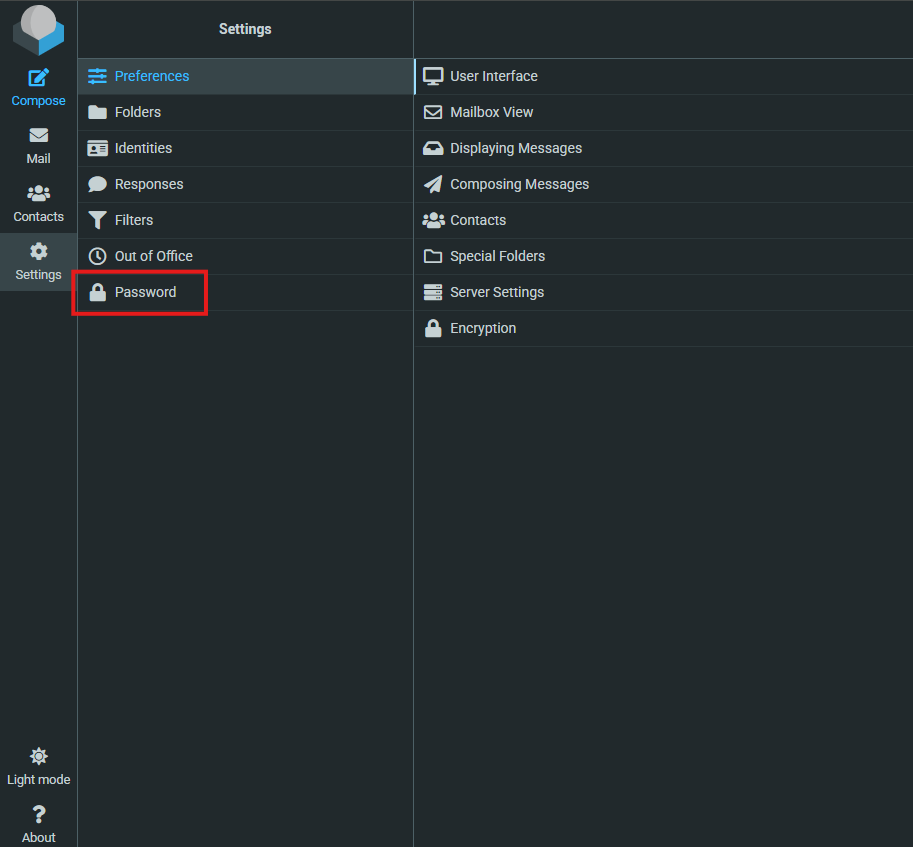
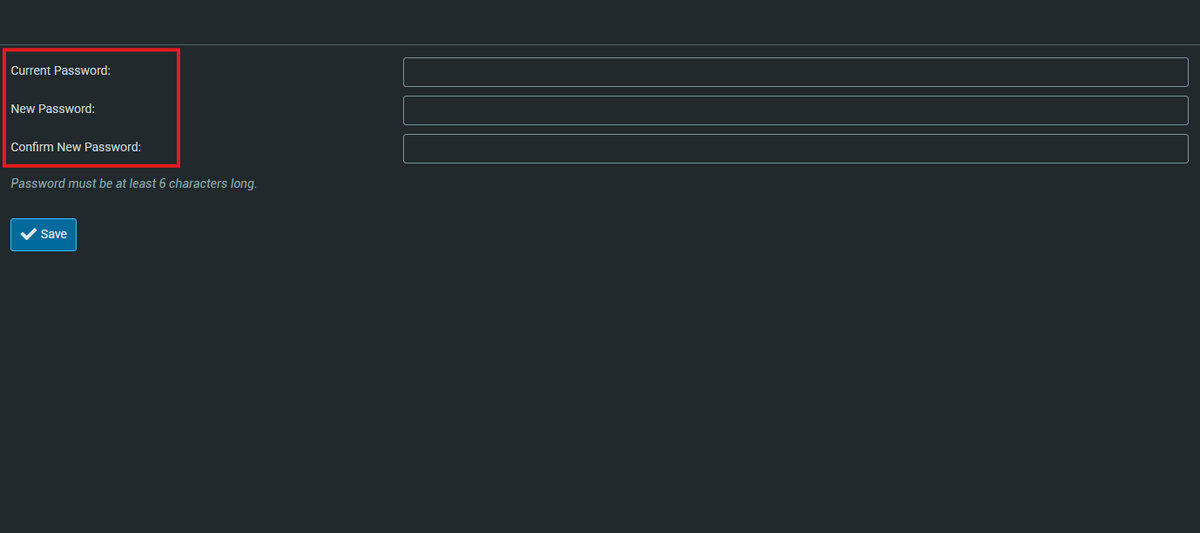
 Usually, email account passwords are managed through the LCwHost interface. However, if you use Roundcube Webmail to access your emails, you can easily update your password directly from Roundcube. You can also watch the video tutorial by clicking the provided link. Follow the steps below: Log in to Roundcube Webmail using your current email credentials. Navigate to Settings and select the Password option. Enter your current password, your new password, and then confirm the new password. Click Save. Your new password will take effect immediately.
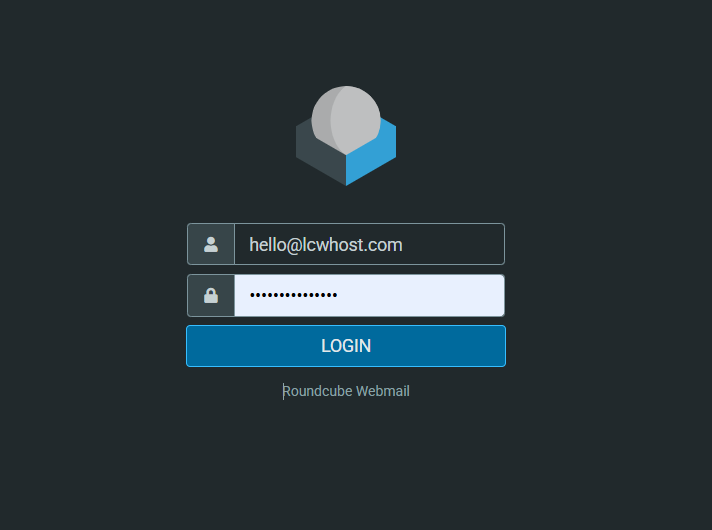


-
ConfigServer Security & Firewall is a popular Linux firewall security suite. It is easy to install, flexible to configure and secure with extra checks. CSF helps to control exactly what traffic is allowed in and out of the server and to protect the server from malicious attacks. Preliminary Requirements: CentOS 7, Fedora 23, Ubuntu 16.04 or Debian 8 OS installed. Installation Of ConfigServer Security & Firewall For CentOS / Fedora firstly you need to install required for CSF Perl packages: yum install perl-libwww-perl.noarch perl-Time-HiRes perl-core zip unzip bind-utils -y For Ubuntu and Debian install the following packages: apt-get install e2fsprogs dnsutils libwww-perl -y Then, download a CSF source archive: wget http://download.configserver.com/csf.tgz tar xzf csf.tgz Then we need to run CSF installation script: cd csf sh install.sh After installation run the test in order to make sure that all required iptables modules are installed on your VPS: perl /usr/local/csf/bin/csftest.pl If all required iptables modules are installed you will receive such result: Testing ip_tables/iptable_filter...OK Testing ipt_LOG...OK Testing ipt_multiport/xt_multiport...OK Testing ipt_REJECT...OK Testing ipt_state/xt_state...OK Testing ipt_limit/xt_limit...OK Testing ipt_recent...OK Testing xt_connlimit...OK Testing ipt_owner/xt_owner...OK Testing iptable_nat/ipt_REDIRECT...OK Testing iptable_nat/ipt_DNAT...OK RESULT: csf should function on this server After checking iptables modules we need to enable CSF. For this reason, you may open and edit configuration file: vi /etc/csf/csf.conf You need to change "TESTING" value to the zero: TESTING = "0" Also, change the "RESTRICT_SYSLOG" value to 3: RESTRICT_SYSLOG = "3" Save the configuration file and execute the following command to restart CSF and reload new changes: csf -r If after the restart, you would receive a warning that starts with "*WARNING* Binary location for [SENDMAIL]", run the following commands: echo '#!/bin/sh' > /usr/sbin/sendmail chmod +x /usr/sbin/sendmail Then, to check if everything is fine, run the restart again: csf -r This is it, now ConfigServer Security & Firewall is successfully installed to your server. Enable ConfigServer Security & Firewall Web UI ConfigServer Security & Firewall provides in-built Web UI for the managing firewall via a browser. After enabling Web UI you will be able to access the firewall via a specified port and manage it at the graphical interface. Firstly install Perl modules, required for Web UI: For CentOS / Fedora execute: yum install perl-IO-Socket-INET6 perl-Socket6 -y For Debian / Ubuntu execute: apt-get install libio-socket-ssl-perl libcrypt-ssleay-perl libnet-libidn-perl libio-socket-inet6-perl libsocket6-perl libwww-perl -y In order to enable Web UI you need to edit the configuration file: vi /etc/csf/csf.conf You need to modify following values: # 1 to enable, 0 to disable UI = "1" # Set this to the port that want to bind this service to. You should configure # this port to be >1023 and different from any other port already being used # # Do NOT enable access to this port in TCP_IN, instead only allow trusted IP's # to the port using Advanced Allow Filters (see readme.txt) UI_PORT = "7777" # Optionally set the IP address to bind to. Normally this should be left blank # to bind to all IP addresses on the server. # # If the server is configured for IPv6 but the IP to bind to is IPv4, then the # IP address MUST use the IPv6 representation. For example 1.2.3.4 must use # ::ffff:1.2.3.4 # # Leave blank to bind to all IP addresses on the server UI_IP = "111.111.111.111" # This should be a secure, hard to guess username # # This must be changed from the default UI_USER = "username" # This should be a secure, hard to guess password. That is, at least 8 # characters long with a mixture of upper and lowercase characters plus # numbers and non-alphanumeric characters # # This must be changed from the default UI_PASS = "password" , where: UI - should be "1" for enabled Web UI; UI_PORT - port for accessing CSF firewall via the browser; UI_IP - your server's IP address. Leave it blank to bind to all IP addresses on the server (e.g. if you have additional IPs); UI_USER - username for accessing CSF firewall via the browser; UI_PASS - password for accessing CSF firewall via the browser. After it add your public IP to the /etc/csf/ui/ui.allow file in order to allow access to CSF Web UI: echo "your_public_ip_address" >> /etc/csf/ui/ui.allow Finally restart lfd (Login Failure Daemon) daemon, which uses CSF Web UI: service lfd restart Now you could access ConfigServer Security & Firewall Web UI via your server's IP address and specified earlier port: https://server_ip_address:port Note: use HTTPS to access Web UI. DoS / DDoS Attacks Prevention With ConfigServer Security & Firewall It is possible to configure ConfigServer Security & Firewall to prevent VPS from small and limited DDoS attacks. In order to enable it, you need to edit /etc/csf/csf.conf file. If you have enabled Web UI, you could edit configuration file via it - just go to the "ConfigServer Firewall" and select "Firewall Configuration". In another case you need to edit /etc/csf/csf.conf via SSH: vi /etc/csf/csf.conf First of all you need to set up total number of connections allowed from single host: CT_LIMIT = "20" Set connection tracking interval (in seconds): CT_INTERVAL = "30" Enable email alerts sending for each blocked IP address: CT_EMAIL_ALERT =1 Enable permanent IP addresses blocking ("1" to enabled, "0" for disabled): CT_PERMANENT = 1 If you did not enable permanent IP addresses blocking, you could set interval (in seconds) within which IP will remained blocked: CT_BLOCK_TIME = 1800 If you would like to enable it only for specific ports, you need to provide it in CT_PORTS. If you keep it empty, all ports would be checking: CT_PORTS = "22,23,80,443" After it, you need to restart CSF service and lfd daemon. If you have performed changes via Web UI, just press the button "Restart csf+lfd'. Else execute the following command via SSH: csf -r && service lfd restart More information about ConfigServer Security & Firewall could be found here: https://www.configserver.com/cp/csf.html
-
SpamAssassin is a computer program used for e-mail spam filtering. SpamAssassin uses a variety of spam-detection techniques, including DNS-based and fuzzy-checksum-based spam detection, Bayesian filtering, external programs, blacklists, and online databases. It will save your mailbox from many unwanted spam emails. For this tutorial we are using Ubuntu 16.04 distribution, however, you should be able to use it for all Debian and Ubuntu distributions we offer on Time4VPS. Update System First things first. Like always, first of all, we recommend updating your server. It can be done by simply executing: apt-get update Installation After our server is up to date we can start the installation. Use apt-get to install Spamassassin and spamc: apt-get install spamassassin spamc -y While installing you can get a message about the kernel, we are using stable kernel version 2.6.32 for OpenVZ, so you do not need to worry about that, just click OK. Adding User There are a few steps that has to be taken to make it fully functional. To run SpamAssassin you need to create a new user on your VPS. First, add the group spamd: groupadd spamd Then add the user spamd with the home directory /var/log/spamassassin: useradd -g spamd -s /bin/false -d /var/log/spamassassin spamd Then create the directory /var/log/spamassassin: mkdir /var/log/spamassassin And change the ownership of the directory to spamd: chown spamd:spamd /var/log/spamassassin Setting Up Open the SpamAssassin config file: nano /etc/default/spamassassin Note: If you do not have nano installed on your server, you can do it simply with the command: apt-get install nano To enable Spamassassin and automatic rule updates in order to get the latest spam filtering rules to find the CRON and ENABLED variables and change then to: ENABLED=1 CRON=1 Now create a variable named SAHOME with the Spamassassin home directory: SAHOME="/var/log/spamassassin/" Find and change the OPTIONS variable to: OPTIONS="--create-prefs --max-children 2 --username spamd \ -H ${SAHOME} -s ${SAHOME}spamd.log" After setting up is complete we can start the Spamassassin daemon by using the following code: service spamassassin start Configuring Postfix SpamAssassin is set up, however, emails are still not going through it. To enabling that, open Postfix config file: nano /etc/postfix/master.cf Find the line: smtp inet n - - - - smtpd And add the following to the end of the line: -o content_filter=spamassassin Now, Postfix will pipe the mail through SpamAssassin. To setup after-queue content filter add the following line to the end of the file spamassassin unix - n n - - pipe user=spamd argv=/usr/bin/spamc -f -e /usr/sbin/sendmail -oi -f ${sender} ${recipient} For the changes to take effect restart postfix: service postfix restart Configuration To get the maximum use of SpamAssassin you have to create rules. Open the SpamAssassin default rules file using: nano /etc/spamassassin/local.cf To activate a rules uncomment line by removing the # symbol in the beginning of the line. Some line we recommend to uncomment: rewrite_header Subject *****SPAM***** - To add a spam header to spam mail. required_score 5.0 - Spamassassin gives a score to each mail after running different tests on it. This line marks the mail as spam if the score is more than the value specified in the rule. use_bayes 1 - To use Bayes theorem to check mails. bayes_auto_learn 1 - To enable Bayes auto-learning. After adding the above details, save the file and restart spam assassin. service spamassassin restart Testing To see if SpamAssassin is working, you can check the SpamAssassin log file using: nano /var/log/spamassassin/spamd.log or send the email from an external server and check the mail headers. Conclusion Using SpamAssassin, it is very easy to protect your mailbox from spammers. The best thing about SpamAssassin is that we can create rules by ourselves and manage it.

-
The article explains how not to lose RDP connection when/if you want to access to VPN from your Windows VPS servers. For quite some time the Windows VPS had the issue. When you connected to VPN from Windows VPS, you suddenly lose the RDP connection, this situation could be solved by performing the following steps: First, check your Public IP, you can find it here(under "Your IP Address" line): https://lg.lcwhost.net/speedtest/ Open your command line(cmd) as Administrator and enter the following command: route print You should be seeing a similar view: Using the previous command, you need to find the line VirtuozzoVirtIO Ethernet Adapter ID, which is 5, in this example. We need to add a new route that connects RDP to your public IP directly, it can be done with this command: route ADD 9.9.9.9 MASK 255.255.255.255 169.254.0.1 if 5 This command explanation below: 9.9.9.9 - Is the IP you use to connect to RDP, basically your server IP. 255.255.255.255 - net mask - no need to change 169.254.0.1 - link-local interface IP - no need to change. 5 - VIrtuozzoVirtIO interfaco ID - we have found the ID in the 2nd and 3rd steps of this tutorial. Note. In order to keep the command permanent, which means, to keep it active after reboot, you need to add the argument - p This option sets your specific IP, not to lose access if you connect to VPN. If you have a dynamic IP, this method won't work.
-
Windows Servers are quite different from Linux servers referring to the network and software blocking and restrictions. While Linux servers do not block any connection most of the time and you rarely need to manually open a port or allow some connection, the Windows servers usually do block most of the connections. In such cases, you have to make "Allow" or "Block" rules in order to control the inbound and outbound connections, since the Windows OS do not always offer that for you once you installing the software, which sometimes could be annoying. In this article, we will present the basic usage of Windows Firewall, the tool that is used to block and/or allow the specific connections or software. You can open the Windows Firewall, by pressing "Start" icon/button on and then finding the "Control Panel" icon. Once you are in the Control Panel, look for a "Windows Firewall" and press it. Now you have opened a main Windows Firewall menu, which consists of few option, for example, turn on/off the windows firewall, notification settings, restore defaults function and the advanced settings. Basically, you can manually set any settings to suit your requirements, but we will try to briefly describe the Advanced settings, which are mostly used to create new rules, delete existing rules for your Windows Firewall. Once you press the "Advanced Settings", you will see the view like below: You can see many settings, but we will be describing the use of "Inbound Rules" and "Outbound Rules", which we believe are often ignored when you face some issue after installing new software. Inbound Rules - refers to every incoming connection via specific port or software. Outbound Rules - refers to every outgoing connection via specific port or software. Typical situation, a new software is installed on Windows Server, but it does not work because it can not connect to the outside or vice versa. You can simply create new rules for that software. 1. Press "New Rule..."; 2. Select "Program" and press "Next"; 3. Choose "This program path:" and press "Browse". You will need to provide the full path to the main programs file (.exe) and press "Next"; 4. This step is very important since you choose whether to Allow or to Block the connection. Once you have done that, press "Next"; 5. In this step, you will have to choose when will be rule applied (Domain, Private, Public) and press "Next"; 6. Finally, you name the rule and/or enter a brief description for documentation, press "Finish". Note. The "Private" and "Public" in step 5, refer to either Private Network or Public Network. So that was the example of creating a simple rule to allow or deny specific program. The similar procedure is with all other options, for example, Port. You are also allowed to create custom rules, but we will not go into details since we believe it is used for very specific situations.
-
An exploited or hacked VPS is one that is no longer fully under your control. Someone else is now partially controlling your VPS and using it for their own purposes. Here are some common reasons to exploit a VPS: • To send out spam email; • To launch attacks against other servers (thus, consuming your CPU, memory, and bandwidth resources); • To install a phishing website on your VPS to gain access to sensitive information. Background There are two primary ways a VPS may be compromised: A. If the hacker has guessed a password of a user on the VPS. This may be an email, FTP, or SSH use; B. If the hacker has gained access through a security hole in a web application (or its addons/plugins) such as WordPress, Joomla, Drupal, etc. 1. How do I know if my service has been exploited? Many times, customers may not notice that they have been compromised until they are contacted by the Time4VPS Abuse Department. To prevent any delays in learning about a breach, you must periodically check your VPS log files. 2. What steps can I take to prevent my service from being hacked? A. Use Strong Passwords: Be sure to use strong passwords. This would include passwords for the Client Area, VPS, any of your control panels, etc. The stronger the password the better protected your service will be. GRC (Gibson Research Corporation) provides a free tool that will generate strong passwords for you that are a mixture of lowercase, uppercase, numerical, and symbols.. B. Use Secure Protocols: When connecting to your services, it is best to use secure connections whenever possible. This would include SSL connections for email and using sFTP instead of the more common FTP protocol. C. Maintain Regular Backups: Be sure to backup your data on a regular basis. If a domain, or your entire service, becomes compromised, it may go unnoticed for a while. You would not want to restore a compromised backup. You always want to restore from the last known clean backup. D. Harden Your PHP Settings: Just making a few changes to your php.ini file can greatly increase the security of your service. Here are a few settings we recommend: • Enable Safe Mode; • Disable allow_url_fopen; • Increase PHP security with PHPSecInfo. E. Working with Third-Party Applications: When you are working with third-party software such as Wordpress, Drupal, or Joomla, please consider these points. This is also very important with applications that rely on plug-ins for extended functionality: • Be careful with what third-party tools you choose to use. Pick software that is known to have a reliable reputation for security. Consider using software packages that have frequent updates to patch security holes; • Be sure to update your software regularly. Subscribe to the RSS feeds of any applications you use. This is a fantastic, effortless way to stay aware of any new updates that you may need to stay secure. I've been hacked. What can I do? Backup your domains and service, but please remember that this backup will probably contain compromised scripts. You do not want to restore directly from this backup. How can you backup and restore a MySQL database: • Take your website offline temporarily, or until you know you have resolved the issue. Alternatively, consider displaying an "Under Construction" page. This should be done to prevent any hacked pages from being served to your customers; • Start performing a damage assessment. What is the scope of the problem? Is only one domain affected? Are other domains on your service affected also? • Start the recovery process. The best thing you can do is to reinstall your environment from a known clean source; • Finally, take the steps to restore your websites. Useful Links Join and contribute to online communities that are dedicated to helping fight badware/phishing. Here are a few examples: • http://www.stopbadware.org; • http://www.antiphishing.org; • http://www.phishtank.com. -- Artice source: mediatemple (MT)
-
Iptables is basically a powerful firewall, which can allow a user to set specific rules to control incoming and outgoing traffic. You can use it to block the specific port, IP addresses and much more. In this article, we present the most common uses of iptables. The iptables rules can be specified with 3 blocks, which are used for a specific purpose (called Chains😞 INPUT - All packets destined for the host computer. OUTPUT - All packets originating from the host computer. FORWARD - All packets neither destined for nor originating from the host computer, but passing through (routed by) the host computer. This chain is used if you are using your computer as a router. The first command we present is used to flush the existing iptables rules, this can be useful if we want to start with new rules or if we have accidentally blocked ourselves (Our Clients Area has a button for this case specifically - "Flush iptables"): iptables -F Note. If you want to flush a single Chain, specific rules. You can use this: sudo iptables -F INPUT Next commands are used to check current rules that are active within your server: iptables -L iptables -S Note. You can add specific words, like INPUT, FORWARD OR OUTPUT. For example: iptables -L INPUT This will let you specify the rules by their purpose (Chains). Note. You can also add "-v" to your command (iptables -L -v), this will let you check the packets and their size matched with each rule. Now we can continue with more specific rules to make some simple rules. Usually, a Firewall is used to block something first, and only then to allow something. So here are some rules which help you to block the connections. In order to block a connection from the specific IP address you can use this: iptables -A INPUT -s 1.1.1.1 -j DROP iptables -A OUTPUT -s 1.1.1.1 -j DROP iptables -A INPUT -s 1.1.1.1 -j REJECT Note. REJECT is used to give a response that the connection is not blocked and sends a message "connection refused". If you want to block a specific port, for example, SMTP port 25, you can use this: iptables -A INPUT -p tcp --dport 25 -j DROP iptables -I OUTPUT -p tcp --dport 25 -j DROP Allow Incoming SSH connection only from a specific IP: iptables -A INPUT -i venet0 -p tcp -s 1.1.1.1 --dport 22 -m state --state NEW,ESTABLISHED -j ACCEPT iptables -A OUTPUT -o venet0 -p tcp --sport 22 -m state --state ESTABLISHED -j ACCEPT This actually allows only specific IP to connect to the server using 22 port. Also, every time it happens, it establishes a status, which will be used in the second rule to allow the same IP the outgoing traffic. Following sets of rules are for HTTP and HTTPS connections: iptables -A INPUT -i venet0 -p tcp --dport 80 -m state --state NEW,ESTABLISHED -j ACCEPT iptables -A OUTPUT -o venet0 -p tcp --sport 80 -m state --state ESTABLISHED -j ACCEPT iptables -A INPUT -i venet0 -p tcp --dport 443 -m state --state NEW,ESTABLISHED -j ACCEPT iptables -A OUTPUT -o venet0 -p tcp --sport 443 -m state --state ESTABLISHED -j ACCEPT The first set of rules allows HTTP and the second set of rules allows HTTPS connection using the default ports 80 and 443 Next rules allow outside users to ping to your server: iptables -A INPUT -p icmp --icmp-type echo-request -j ACCEPT iptables -A OUTPUT -p icmp --icmp-type echo-reply -j ACCEPT The same applies to block it: iptables -A INPUT -p icmp --icmp-type echo-request -j DROP iptables -A OUTPUT -p icmp --icmp-type echo-reply -j DROP To allow loopback access to your server, for example using localhost: iptables -A INPUT -i lo -j ACCEPT iptables -A OUTPUT -o lo -j ACCEPT Allowing MySQL connection from specific IP address: iptables -A INPUT -i venet0 -p tcp -s 1.1.1.1 --dport 3306 -m state --state NEW,ESTABLISHED -j ACCEPT iptables -A OUTPUT -o venet0 -p tcp --sport 3306 -m state --state ESTABLISHED -j ACCEPT Allowing POP3 or IMAP traffic: iptables -A INPUT -i venet0 -p tcp --dport 143 -m state --state NEW,ESTABLISHED -j ACCEPT iptables -A OUTPUT -o venet0 -p tcp --sport 143 -m state --state ESTABLISHED -j ACCEPT iptables -A INPUT -i venet0 -p tcp --dport 110 -m state --state NEW,ESTABLISHED -j ACCEPT iptables -A OUTPUT -o venet0 -p tcp --sport 110 -m state --state ESTABLISHED -j ACCEPT Also, this can be applied for POP3/IMAP using a secure connection: iptables -A INPUT -i venet0 -p tcp --dport 993 -m state --state NEW,ESTABLISHED -j ACCEPT iptables -A OUTPUT -o venet0 -p tcp --sport 993 -m state --state ESTABLISHED -j ACCEPT iptables -A INPUT -i venet0 -p tcp --dport 995 -m state --state NEW,ESTABLISHED -j ACCEPT iptables -A OUTPUT -o venet0 -p tcp --sport 995 -m state --state ESTABLISHED -j ACCEPT Note. When you describe network interface in the rules, for example, venet0, do not forget to change it, if your server uses different network interfaces, for example, eth0 or other. One last use of iptables is that it can be used to prevent the DDoS as well, by limiting the connections per minute: iptables -A INPUT -p tcp --dport 80 -m limit --limit 10/minute --limit-burst 100 -j ACCEPT More details about this one: -m limit: This uses the limit iptables extension –limit 25/minute: This limits only a maximum of 10 connections per minute. –limit-burst 100: This value indicates that the limit/minute will be enforced only after the total number of connection have reached the limit-burst level. You can change the details based on your requirements, to prevent some attacks.
-
How do you block an IP using iptables? iptables -A INPUT -s xx.xx.xx.xx -j DROP How do you block an IP from a specific port? iptables -A INPUT -p tcp -s xx.xx.xx.xx --dport PORT -j DROP (xx.xx.xx.xx is the remote IP address and PORT is the port number you wish to allow/deny access to.) How do you allow access to an IP? iptables -A INPUT -s xx.xx.xx.xx -j ACCEPT How do you allow access to an IP to a specific port using iptables? iptables -A INPUT -p tcp -s xx.xx.xx.xx --dport PORT -j ACCEPT (Again, xx.xx.xx.xx is the remote IP address and PORT is the port number you wish to allow/deny access to.) How do you block a scanner on a server for example "blablabla.at.ISC.SANS" using iptables? iptables -I INPUT -p tcp --dport 80 -m string --algo bm \ --string 'GET /blablabla.at.ISC.SANS.' -j DROP More information can be found in our article about the most common iptables rules: https://www.lcwhost.org/topic/21-basic-and-most-common-iptables-rules/