
Yang M.
Moderators
-
Joined
-
Last visited
Everything posted by Yang M.
-
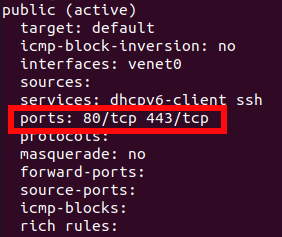
Let's Encrypt is a certificate authority that provides free certificates in a fully automated process. In this guide, you will learn how to set up a TLS/SSL certificate from Let’s Encrypt on an Centos 7 / AlmaLinux 8 servers running Apache as a web server. Preparation Before enabling the Let's Encrypt certificate, make sure you have Apache Web Server installed on your server. If not, you can check out our Apache web server installation guide. You also need to create a virtual host configuration file by typing this command (if you didn't do it during Apache installation): vi /etc/httpd/conf.d/yourdomain.ltd.conf Add these lines to the configuration file: Please note. Make sure to change the "yourdomain.ltd" to your actual domain. After editing, you can save changes and exit. 1. Creating An Index.Html File For Testing To create an index.html file for testing, run this command: vi /var/www/html/index.html Enter the text for testing in the file: After that, you can save the file and exit. Now you need to change the owner of the ‘/var/www/html/index.html’ file to Apache by entering this command: chown -R apache:apache /var/www/html/index.html This means that Apache can now read this file. 2. Install Certbot On Centos 7 follow these steps to install Cerbot: We need to add the EPEL repository before installing Certbot. Run this command: yum install epel-release Install the Certbot: yum install certbot python2-certbot-apache mod_ssl On AlmaLinux 8 follow these steps to install Cerbot: Run this command to add the EPEL repository before installing Certbot: dnf install epel-release Install the Certbot: dnf install certbot python3-certbot-apache 3.Set Up The SSL Certificate To set up the SSL for domain, run this command: certbot --apache -d yourdomain.ltd You can install certificate for multiple domains and subdomains by following this command: certbot --apache -d yourdomain.ltd -d www.yourdomain.ltd -d yourdomain2.ltd -d subdomain.yourdomain2.ltd When issuing a certificate, you will need to provide an email, that you specified previously in virtual host configuration file ([email protected]). You will also need to agree to the Terms of Service (mandatory) and agree or disagree to share your email address with Electronic Frontier Foundation (optional) Please note. When issuing a certificate, you may receive the following error message: Cancel the certificate issue process (enter 'c') and restart Apache service with the following command: systemctl restart httpd After that, try to issue the certificate again. 4.Check SSL Certificate Enter this command to check if SSL issued successfully: ls /etc/letsencrypt/live/yourdomain.ltd/ You should see the following output: cert.pem chain.pem fullchain.pem privkey.pem You can also check SSL in your browser. Open your website and click on the padlock icon in the address bar to see information about certificate. 5.Manual And Automatic Renewal Let’s Encrypt certificates are valid for 90 days. You can manually renew certificate with this command: certbot renew --dry-run If the certificate is less than 30 days away from expiration, this command will renew it. If you want to specify auto-renewal, you can edit the crontab and create cronjob to run the above command twice a day automatically: crontab -e Add this line to the crontab: You're all set. When necessary, certbot will renew your certificates and reload Apache to pick up the changes. Please note. If, after activating the certificate, your site is still not available and you receive "Secure Connection Failed" error, make sure to allow traffic via HTTPS (port 443), which could be blocked in firewalld by default. You can check if HTTPS enabled, using this command: firewall-cmd --list-all The output will provide you information about enabled services. In this screenshot, you can see that port 443 is enabled: If 443 port disabled, you can enable it with firewalld or iptables. To enable https service in firewalld, use this command: firewall-cmd --permanent --add-service=https Then reload the firewall: firewall-cmd --reload To enable https in iptables, use this command: iptables -I INPUT -p tcp -m tcp --dport 443 -j ACCEPT Then save the changes: iptables-save

-
Introduction The Apache HTTP web server is currently the most popular web server software in the world. It is well suited for working with large projects and is very flexible in terms of configuration, which makes it possible to implement all the features of the hosted web resource. In this guide you will learn how to install Apache web server on RedHat based distributions (CentOS, AlmaLinux). Step For AlmaLinux 8 Only: Import GPG Key Repository This step is for AlmaLinux 8 only. Skip this step if you are installing Apache on CentOS 7. Run the following command to install updated GPG keys on AlmaLinux 8: rpm --import https://repo.almalinux.org/almalinux/RPM-GPG-KEY-AlmaLinux 1. Installing Apache Make sure your software is updated before the actual installation. You can do this with the following command: yum update After updating the packages, run the following command to install Apache: yum install httpd 2. Starting Apache To start Apache, run this command: systemctl start httpd 3. Apache Status Check To check Apache status, run the following command: systemctl status httpd The output will provide Apache and some additional information: You can also verify if Apache was enabled on your server, by entering your server's public IP address in your web browser: http://your_server_IP_address If everything is correct, you will see the default Apache web page (different for CentOS and AlmaLinux): CentOS: AlmaLinux: 4. Additional Configurations If you don't want Apache to start automatically on every system boot, run the following command: systemctl disable httpd If you want to re-enable this feature and automatically start Apache after every boot, run the following command: systemctl enable httpd To stop Apache, run this command: systemctl stop httpd You can restart Apache with: systemctl restart httpd To reload Apache without losing connections, enter the following command: systemctl reload httpd 5. Virtual Host (Optional) VirtualHost is a directive in the configuration file of the Apache web server, designed to match IP addresses available on the server, domains and directories on the server, as well as manage sites available on the server. You can create a virtual host configuration file by typing this command: vi /etc/httpd/conf.d/yourdomain.ltd.conf Add these lines to the configuration file: After editing, you can save changes and exit. Be sure to restart Apache after creating the configuration file: systemctl restart httpd To establish a secure connection, you can check our guide for Let's Encrypt.
-
Introduction Joomla is a free and open source content management that uses a PHP and a backend database, such as MySQL. It offers a wide variety of features that make it an incredibly flexible content management system right out of the box. It was created in 2005 and is currently the 2nd most popular content management site online. Requirements Before working with Joomla, you need to have LAMP installed on your virtual server. If you don't have it you can find the tutorial for setting it up here. Once you have the user and required software, you can start installing Joomla! Update Server First things first. Like always, you should update your server before installing anything on your server: apt-get update 1. Download Joomla To start, create a directory where you will keep your Joomla files temporarily: mkdir temp Switch into the directory: cd temp Then you can go ahead and download the most recent version of Joomla straight from their website. You can find newest version on: https://www.joomla.org/download.html Currently, the latest version is 3.5.1. wget https://github.com/joomla/joomla-cms/releases/download/3.5.1/Joomla_3.5.1-Stable-Full_Package.zip This command will download the zipped Joomla package straight to your user's home directory on the virtual server. You can untar it with the following command, moving it straight into the default apache directory, /var/www : unzip Joomla_3.5.1-Stable-Full_Package.zip -d /var/www/html Do not forget to remove downloaded file: rm Joomla_3.5.1-Stable-Full_Package.zip We will need to change some folders permissions: chown -R www-data.www-data /var/www/html chmod -R 755 /var/www/html Restart apache: service apache2 restart 2. Create the Joomla Database and User Now we need to switch gears for a moment and create a new MySQL directory for Joomla. Go ahead and log into the MySQL Shell: mysql -u root -p Login using your MySQL root password. We then need to create the Joomla database, a user in that database, and give that user a new password. Keep in mind that all MySQL commands must end with semi-colon. First, let's make the database. Feel free to give it whatever name you choose: CREATE DATABASE joomla; Then we need to create the new user. You can replace the database, name, and password, with whatever you prefer: CREATE USER juser@localhost; Set the password for your new user: SET PASSWORD FOR juser@localhost= PASSWORD("password"); Finish up by granting all privileges to the new user. Without this command, the Joomla installer will be able to harness the new MySql user to create the required tables: GRANT ALL PRIVILEGES ON joomla.* TO juser@localhost IDENTIFIED BY 'password'; Then refresh MySQL: FLUSH PRIVILEGES; Exit out of the MySQL shell: exit Restart apache: service apache2 restart 3. Configuring Apache Create a new virtual host directive in Apache. For example, create a new Apache configuration file named ‘joomla.conf’ on your virtual server: sudo a2enmod rewrite touch /etc/apache2/sites-available/joomla.conf ln -s /etc/apache2/sites-available/joomla.conf /etc/apache2/sites-enabled/joomla.conf nano /etc/apache2/sites-available/joomla.conf Note: If nano is not installed on your server you can simple do it with command: apt-get install nano Add the following lines: <VirtualHost *:80> ServerAdmin [email protected] DocumentRoot /var/www/html/ ServerName your-domain.com ServerAlias www.your-domain.com <Directory /var/www/html/> Options FollowSymLinks AllowOverride All Order allow,deny allow from all </Directory> ErrorLog /var/log/apache2/your-domain.com-error_log CustomLog /var/log/apache2/your-domain.com-access_log common </VirtualHost> Note: Do not forgot to change server's admin email address, domain and so on. Restart apache: service apache2 restart 4. Access the Joomla Installer Once you have placed the Joomla files in the correct location on your VPS, assigned the proper permissions, and set up the MySQL database and username, you can complete the remaining steps in your browser. Access the Joomla installer going to your domain name or IP address: http://IP_of_your_server
-
Introduction A "LAMP" stack is a group of open source software that is typically installed together to enable a server to host dynamic websites and web apps. This term is actually an acronym which represents the Linux operating system, with the Apache web server. The site data is stored in a MySQL database, and dynamic content is processed by PHP. In this quick and easy guide, you will learn how to install and download LAMP on an Ubuntu 14.04 LTS server. Step 1: Install Apache The Apache web server is currently the most popular web server in the world, which makes it a great default choice for hosting a website. We can install Apache easily using Ubuntu's package manager, apt. A package manager allows us to install most software pain-free from a repository maintained by Ubuntu. You can learn more about how to use apt here. For our purposes, we can get started by typing these commands: sudo apt-get update sudo apt-get install apache2 -y Afterwards, your web server is installed. You can do a spot check right away to verify that everything went as planned by visiting your server's public IP address in your web browser: http://your_server_IP_address You will see the default Ubuntu 14.04 Apache web page, which is there for informational and testing purposes. Step 2: Install MySQL Now that we have our web server up and running, it is time to install MySQL. MySQL is a database management system. Basically, it will organize and provide access to databases where our site can store information. Again, we can use apt to acquire and install our software. This time, we'll also install some other "helper" packages that will assist us in getting our components to communicate with each other: sudo apt-get install mysql-server php5-mysql -y During the installation, your server will ask you to select and confirm a password for the MySQL "root" user. This is an administrative account in MySQL that has increased privileges. When the installation is complete, we need to run some additional commands to get our MySQL environment set up securely. First, we need to tell MySQL to create its database directory structure where it will store its information. You can do this by typing: sudo mysql_install_db Afterwards, we want to run a simple security script that will remove some dangerous defaults and lock down access to our database system a little bit. Start the interactive script by running: sudo mysql_secure_installation You will be asked to enter the password you set for the MySQL root account. Next, it will ask you if you want to change that password. If you are happy with your current password, type "n" for "no" at the prompt. For the rest of the questions, you should simply hit the "ENTER" key through each prompt to accept the default values. This will remove some sample users and databases, disable remote root logins, and load these new rules so that MySQL immediately respects the changes we have made. At this point, your database system is now set up and we can move on. Step 3: Install PHP PHP is the component of our setup that will process code to display dynamic content. It can run scripts, connect to our MySQL databases to get information, and hand the processed content over to our web server to display. We can once again leverage the apt system to install our components. We’re going to include some helper packages as well: sudo apt-get install php5 php5-mysql php-pear php5-gd php5-mcrypt php5-curl -y This should install PHP without any problems. We’ll test this in a moment. Step 4: Testing PHP5 In order to test PHP script you need to create simple PHP script in directory /var/www/html. in this case I’ll create phpinfo.php: sudo touch /var/www/html/phpinfo.php sudo apt-get install nano sudo nano /var/www/html/phpinfo.php Add the following line: <?php phpinfo(); ?> Save and exit ( Ctrl + O, Ctrl + X). Test the php script you have made from web browser by typing in address bar: http://ip_address/phpinfo.php This page basically gives you information about your server from the perspective of PHP. It is useful for debugging and to ensure that your settings are being applied correctly. At this point you are pretty much finished with the installation, you can begin testing out some webpages, scripts etc.
-
Requrements Before working with phpMyAdmin you need to have LAMP installed on your server. If you don't have the Linux, Apache, MySQL, PHP stack on your server, you can find the tutorial for setting it up here. Install phpMyAdmin The easiest way to install phpMyAdmin is through apt-get: sudo apt-get install phpmyadmin apache2-utils During the installation, phpMyAdmin will walk you through a basic configuration. Once the process starts up, follow these steps: Select Apache2 for the server Choose YES when asked about whether to Configure the database for phpmyadmin with dbconfig-common Enter your MySQL password when prompted Enter the password that you want to use to log into phpmyadmin After the installation has completed, add phpMyAdmin to the Apache configuration. sudo nano /etc/apache2/apache2.conf Add folowing line: Include /etc/phpmyadmin/apache.conf Save and exit ( Ctrl + O, Ctrl + X). Restart Apache with command: sudo service apache2 restart You can then access phpMyAdmin by going to:
-
Winter Sale: Up to 50% Off Linux and Windows VPS! 🔈Stay with LCwHost LTD on Winter Sale 🔥50% Discount for all VPS products 🔸Order your VPS now🔹 ✅Coupon: WINTERSALE23 Order Now: 👉 www.lcwhost.com ➖➖➖➖➖➖➖➖➖➖➖➖ LCwHost Ltd. is a leading cloud hosting service provider in the UK! Phone : +44 7865 236360 Email: [email protected] Website: www.lcwhost.com
-
DRAFT 1.mp4 Don’t miss out on our incredible BLACK FRIDAY sale with unbeatable discounts on all our VPS products. 🔈Stay with LCwHost LTD on Black Friday 🔥50% Discount for all VPS products ⌛️This discount is only active for 14 days, "24th–7th of December." 🔸Order your VPS now🔹 ✅Coupon: BLACKFRIDAY23 Order Now: 👉 www.lcwhost.com ➖➖➖➖➖➖➖➖➖➖➖➖ LCwHost LTD | is a leading cloud hosting service provider in the UK! Phone : +44 7865 236360 Email: [email protected] Website: www.lcwhost.com
-
All Storage Servers is activated with a pre-installed special OS template - "Filer (CentOS 7, Rsync, FTP, Samba) (64-bit)". Take a note, that default folder for data storage in the Storage Server is /home/storage. "Filer" OS template have pre-installed services and tools like: • Rsync tool • FTP (vsFTPd) service • Samba (smbclient, smbd) service 1. Rsync usage 1.1. You can securely sync data between the target server and the Storage Server by using SSH keys. Instructions on how to do that: a. Generate SSH key on the target server (not the Storage Server!): ssh-keygen -f ~/.ssh/id_rsa -q -P "" b. Copy created SSH key to the Storage Server from the target server: ssh-copy-id -i /root/.ssh/id_rsa.pub root@storage_server_IP c. Test the connection between the target server and the Storage Server. Execute this command from the target server: rsync -avz -e "ssh -o StrictHostKeyChecking=no -o UserKnownHostsFile=/dev/null" --progress /home storage_server_IP:/home/storage 2. FTP usage 2.1. "Filer" OS template have FTP service (vsFTPd) installed and ready to use. You can easily log in by using any popular FTP client. Example login details: FTP hostname: xxxx.lcwhost.net Username: root Password: root_user_password Port: 21 3. SAMBA usage 3.1. Login to the Storage Server SAMBA from another Linux systems: smbclient //xxxx.lcwhost.net/storage -U root 3.2. In order to connect (mount) Storage Server and Windows systems (to use it as attached storage) use this guide: https://support.microsoft.com/en-gb/help/4026635/windows-map-a-network-drive (In "Folder" put your server hostname. For example:: \\xxxx.lcwhost.net\Storage) 3.3. In order to connect (mount) Storage Server and MAC OS systems (to use it as attached storage) use this guide: https://support.apple.com/en-us/HT204445 (In "Server Address" enter your server hostname. For example: smb://xxxx.lcwhost.net\Storage) Note: Storage Server is designed for archiving non-critical data (e.g. backups), therefore additional backups are not being done. The customer is responsible for data recovery (e.g. from secondary storage) in the event of unlikely RAID6 failure (when 3 or more hard drives fail at the same time).
-
PostgreSQL (Postgres) is an open-source general-purpose object-relational database management system with numerous advanced capabilities that allows you to build fault-tolerant systems or complex applications. In this tutorial, you will see how you can install PostgreSQL on Ubuntu 20.04. Connect to your server and run system updates: sudo apt update After that, install the Postgres package together with a -contrib package that adds some additional utilities and functionality: sudo apt install postgresql postgresql-contrib Then make sure that the service is running: sudo systemctl start postgresql.service PostgreSQL uses a concept called “roles” to handle authorization and authentication, by default. sudo -i -u postgres So you can access the Postgres prompt with the command: psql It will log you into the PostgreSQL prompt, and you will be able to interact with the database management system. To exit out of the PostgreSQL prompt, you can use this command: \q If you are logged in as the postgres account, you can create a new role by running: createuser --interactive Then you will need to enter the name of the new role and make the role as superuser. Another default assumption of the Postgres authentication system is that each role used to log in will have a database with the same name that it can access. This implies that if the user you established in the previous section is named, for example, test, the role will attempt to connect to a database named test by default. The createdb command can be used to construct the necessary database. If you're logged in as the postgres account, you can use this command: createdb test If you want to use sudo for each command without switching from your normal account, you can use the following command: sudo -u postgres createdb test You'll need a Linux user with the same name as your Postgres role and database to log in with ident based authentication. If you don't have a matching Linux user, use the adduser command to create one. You must do the following using a non-root account with sudo access (not as the postgres user): sudo adduser test Then the new account is created, you can either switch over and connect to the database by running these commands: sudo -i -u sammy psql However, if you want your user to connect to a different database, you can do that by specifying the database: psql -d postgres After running that command, you can check your current connection information by running this command: \conninfo
-
Windows servers accept certificates in .PFX format. You will most likely have a certificate in a standard format consisting of three files - Private Key (privateKey.key), Cert (certificate.crt) and CA Buncle (ca.crt). That means, that you will need to convert those into one .PFX file. On Linux, you can do this from the command line: openssl pkcs12 -export -out certificate.pfx -inkey privateKey.key -in certificate.crt -certfile ca.crt Otherwise, you can use third-party tools such as: https://www.sslshopper.com/ssl-converter.html SSL Installation After you prepare the certificate in .PFX format, you can install it through IIS. Start 'Internet Information Services (IIS)' Select the server name Double-click 'Server Certificates On the right side, in the 'Actions' section, click on 'Import ...' In the pop-up table, click '...'. and indicate your certificate location. In the 'Password' field, type the password that you used to convert the certificate. At the 'Select Certificate Store', select 'Personal' if you do not want to use SNI technology. After saving, the certificate will be installed on your server. SSL assigning to a site Select your site and click 'Bindings ...' in the 'Actions' section In the popup window, click the 'Add ...' button Another new window will open Under 'Type', select https In the 'IP address' field, you can choose whether to assign a specific IP address to this site (the same settings as for port 80 should be left) The 'Port' field does not need to be changed Enter your domain in the 'Host name' field Under 'SSL Certificate', select the certificate you just installed and click 'OK'.
-
This tutorial will show you how to increase disk space after upgrading the Windows Server VPS package. Despite all other resources like RAM, CPU and so on being increased automatically, you will need to perform some additional steps in order to utilize the new disk space that is available for your server. In Windows Server, you can merge the newly available disk space into one drive by expanding your original drive. Extending Drive Connect to your Windows Server via RDP. You can find a tutorial on how to do it here. From the desktop of your Windows Server, open the Server Manager and select Tools > Computer Management. Under the Storage folder in the left pane, select Disk Management. The left pane of Disk Management displays the current formatted hard drive for your server, generally (C:), and the right pane displays the amount of unallocated space. Select the C:\\ drive and right-click on it. Choose Extend Volume from the drop-down menu. This will open the Extend Volume Wizard. Click Next to begin the process. To add all available space to your C:\\ drive (Disk 0) you can keep the default selections and press Next. You will now see the C:\\ drive expand to the maximum available space. To finalize the modifications click Finish. Verifying Disk Space The additional disk drive volume is now displayed in Computer Management and is available to use. You can verify that the Extend process worked correctly by loading the Computer Manager from the Server Manager and checking the disk size for the C:\\ drive in Disk Management.
-
Windows server by default has many restrictions, and security options enabled. One such feature may cause some downloaded files to be locked. For example, if you download an installation file from some unknown source and try to execute it, it just won't start, and it would look like nothing is happening - this most likely means a file is locked by the system. You can resolve this by following these steps: Press the right mouse button on the file that isn't opening; Select "Properties" from the list; Select tab "General"; At the bottom of it you will see the following: To unlock the file, simply check the "Unblock" checkbox and then apply the changes. Once this is done, you will be able to install the software or open a locked file.
-
Although OpenLiteSpeed doesn’t require a control panel service, we still recommend using one, especially if you’ve never used OLS before. For this, CyberPanel is a good choice because it will do most of the configuration for you, so you don’t need to stress with permissions, virtual hosts, or domain mapping.Although OpenLiteSpeed doesn’t require a control panel service, we still recommend using one, especially if you’ve never used OLS before. For this, CyberPanel is a good choice because it will do most of the configuration for you, so you don’t need to stress with permissions, virtual hosts, or domain mapping. In this article, I’ll show you how to use CyberPanel on OpenLiteSpeed. Let’s begin: How To Use CyberPanel On OpenLiteSpeed Basic Requirements Centos 7.x, Centos 8.x, Ubuntu 18.04, Ubuntu 20.04, Ubuntu 22.04 Python 3.x 1GB or more RAM. 10GB Disk Space. Difference between CyberPanel and CyberPanel Ent? CyberPanel comes in two flavors: one is simply called CyberPanel and the second is called CyberPanel Ent. CyberPanel comes packaged with OpenLiteSpeed and is completely free for an unlimited number of domains and worker processes. However, CyberPanel Ent comes packaged with LiteSpeed Web Server Enterprise and it’s free for only 1 domain. Installing Cyberpanel All the big VPS providers have a one-click installer available from the interface to install Cyberpanel, however, if yours doesn’t or you just want to get your hands dirty all you need to do is run the following command: # sh <(curl https://cyberpanel.net/install.sh || wget -O - https://cyberpanel.net/install.sh) !!! The installation must be run as root (sudo will not work) !!! How to use Cyberpanel on Openlitespeed After running the command you should see something similar to the image above. Install choices The installer has a few steps that you need to go through as follows. Choose install action This step lets you choose whether to install CyberPanel, CyberPanel Ent, or exit the installer. Note: If you choose CyberPanel Ent, you need to first get a license even for the free tier. Check out the pricing table. Install Full service for CyberPanel? This will include PowerDNS, Postfix and Pure-FTPd This is a yes or no switch that will install some extra packages that will be used by the panel. Do you want to setup Remote MySQL? (This will skip installation of local MySQL) If you don’t want/have a remote MySQL instance, the installer will install a local instance and configure it for its use. However, if you already have an instance made for this purpose then you can choose yes and provide the connection credentials. Setup admin password You can either choose the default password which is 1234567, randomly generate one, or enter your own. Choose optional installs You can then choose if you want to use and install Memcache for cache purposes as well as Redis for object caching and other stuff. Besides the two mentioned above, you also have the option to set up the CyberPanel watchdog which is in beta (or was in beta at the time this article was written). Finally, the installer will proceed with installing CyberPanel on your system. However, keep in mind that depending on your server resources it may take 5 or more minutes. While CyberPanel is being set up As you wait for the installer, you can make sure that your firewall or security group has the following ports open: TCP: 8090 for CyberPanel TCP: 80, TCP: 443, and UDP: 443 for webserver TCP: 21 and TCP: 40110-40210 for FTP TCP: 25, TCP: 587, TCP: 465, TCP: 110, TCP: 143, and TCP: 993 for mail service TCP: 53 and UDP: 53 for DNS service Testing it out After the successful installation you can access CyberPanel using the details below: https:<IP Address>:8090 Username: admin Password: 1234567 (or the password you set) How to use CyberPanel on Openlitespeed How to use CyberPanel on Openlitespeed 503 Error After Install If you get a 503 error after installing CyberPanel, you can do one of the following things. 1. Check LSCPD Status # systemctl status lscpd If LSCPD is not running, start LSCPD using: # systemctl start lscpd 2. Manually set up virtualenv # source /usr/local/CyberCP/bin/activate # pip install --ignore-installed -r /usr/local/CyberCP/requirments.txt # deactivate # virtualenv --system-site-packages /usr/local/CyberCP # systemctl restart lscpd 3. Install Logs If after this you are still having issues, you can try to find errors in the install logs, they are located at: # /var/log/installLogs.txt And this is how you use CyberPanel on OpenLiteSpeed. Pretty easy, right? You just need to follow a few simple steps. Now, what if I told you you could do this even easier, with LCwHost Ltd? Because LCwHost Ltd automates repetitive processes, you could run this installation with minimal coding requirements.
-
Sentora server control panel by default comes with PHP 5.3.20, MySQL 5.5.29, Apache 2.4.3, yet these packets can be upgraded to another version in the future from the Sentora creators side. This guide is compatible with our Standard VPS or KVM Linux services while using our CentOS 7 OS template. Disclaimer Sentora is currently not actively developed and we do not recommend it using on a production server. Requirements. Root login access (sudo does not work). Recommendations. Sub-domain pointed to the server IP address for accessing the panel through it after installation. If required, you can change your server hostname if required before installation. 1. Minimizing OS template. Since Sentora requires minimal distribution installation, the image has to be minimized. For this you can view our another guide prepared for different OS distributions: https://www.lcwhost.org/topic/42-how-to-make-minimal-os-image/ 2. Installation initiation for the panel. After minimizing the OS template, you would have to install curl to ease up the installation process: apt-get install curl After you will verify curl installation you can initiate the installation of the Sentora panel: bash <(curl -L -k -Ss http://sentora.org/install) 3. Ending of installation. The whole installation of Sentora packages should be done automatically without more interaction from your side. At the end of the installation, for configuration of the system, you will be asked to set up the geographical location for the panel (for timezone usage), the sub-domain that will be related to the panel and IP address. Firstly for the location settings, you will have to choose the geographic area and the city related to your timezone region. In our example Europe has been used: After the time zone will be selected, you will have to set up the sub-domain and the IP address for the server to be used. By default the installation guide will offer your server hostname as the address for your panel, however, you can change it for any other sub-domain that is pointed to the server. The IP address should remain as it is since it also is filled automatically unless you have ordered the server with multiple IP addresses and you wish to set the additional IP for the usage (sub-domain has to be pointed to this IP): Enter the sub-domain you want to access Sentora panel: your.sub-domain.tld Enter (or confirm) the public IP for this server: 12.34.56.78 If the sub-domain will be pointed to the related IP address and the IP does belong to the VPS on which the configuration is done, the DNS check will be initiated and installation will come to the end. 4. Finishing the installation: At the end of the installation, you will receive log-in information from the Sentora panel and passwords (generated randomly each time) as can be seen in the picture. The login for the Sentora panel will be "zadmin" and the password will be provided blow of it. You can copy this information from the console during installation, or later on, it can be seen in the /root/passwords.txt file that will be left on the server. To finish up the installation, restart for the server will be required, that you can initiate by entering "y" into the console and pressing the "Enter" button. 5. Password change The password for the main zadmin user can be changed from the Sentora menu after log-in. To change it in the menu select "Account information" and choose "Change password".
-
In order to make a standard OpenVZ OS image minimal you need to follow these instructions: 1. Install the standard OS from the client area 2. Login to the VPS SSH and execute one of the following commands (depending on your OS): CentOS 6 64-Bit yum remove acl apr apr-util apr-util-ldap aspell attr authconfig avahi-libs bind bind-libs bzip2 centos-indexhtml cronie cronie-noanacron crontabs cups-libs cvs cyrus-sasl dhclient dhcp-common elfutils fetchmail finger finger-server ftp gettext gnutls gpg-pubkey-c105b9de gpm-libs hesiod httpd httpd-tools iptables-ipv6 jwhois libcap-ng libgomp libgssglue libjpeg-turbo libpcap libpng libtalloc libtdb libtevent libtiff libtirpc lm_sensors-libs lsof lynx m4 mailcap mailx man man-pages mlocate ncompress net-snmp net-snmp-libs net-snmp-utils newt newt-python nscd ntsysv perl perl-Module-Pluggable perl-Pod-Escapes perl-Pod-Simple perl-libs perl-version portreserve procmail rpcbind rsync samba-client samba-common samba-winbind samba-winbind-clients screen sendmail sendmail-cf setuptool slang stunnel sudo talk talk-server tcpdump tcsh telnet time traceroute unzip usermode vim-common vim-enhanced which xinetd xz xz-lzma-compat -y; yum clean all CentOS 7 64-Bit For CentOS 7 64-bit, login to the VPS SSH and execute the following command: yum remove tcpdump mailx stunnel vim-enhanced vim-filesystem elfutils ntsysv bzip2 lsof traceroute telnet ethtool man-pages libtevent httpd bind-libs-lite apr hunspell apr-util libldb slang libss make libselinux-utils procmail gpm-libs libpcap json-c dhcp-common pytalloc policycoreutils usermode centos-logos cups-libs samba-libs cronie-noanacron libsmbclient cyrus-sasl libpipeline libaio rsyslog sendmail-cf samba-client rpcbind nscd talk-server setuptool screen sudo tcsh fetchmail mailcap hunspell-en ftp attr unzip time talk ncompress bind-license bind-libs libtalloc httpd-tools libtdb bind hunspell-en-US hesiod newt hunspell-en-GB avahi-libs which m4 vim-common finger dhcp-libs newt-python logrotate openssl libwbclient libtirpc samba-common crontabs cronie sendmail libestr man-db xinetd dhclient iptables-services mlocate finger-server rsync authconfig e2fsprogs -y; yum clean all Debian 7 64-Bit If you are using Debian 7 64-bit, login to your VPS SSH and type in the following command: DEBIAN_FRONTEND=noninteractive apt-get remove --purge -y -o Dpkg::Options::="--force-confdef" -o Dpkg::Options::="--force-confold" apache2 apache2-doc apache2-mpm-prefork apache2-utils apache2.2-bin apache2.2-common apt-utils bind9 bind9-host bind9utils binutils bsd-mailx bsdmainutils bzip2 ca-certificates console-common console-data cracklib-runtime cron db-util db5.1-util debconf-utils debian-keyring dialog expat fetchmail file finger fontconfig fontconfig-config fonts-freefont-ttf ftp gettext groff-base info install-info iputils-arping iputils-tracepath isc-dhcp-client isc-dhcp-common kbd ldap-utils less libapr1 libaprutil1 libaprutil1-dbd-sqlite3 libaprutil1-ldap libapt-inst1.5:amd64 libavahi-client3:amd64 libavahi-common-data:amd64 libavahi-common3:amd64 libbind9-80 libcap2:amd64 libcrack2 libcroco3:amd64 libcups2:amd64 libdns88 libfile-copy-recursive-perl libfontconfig1:amd64 libfreetype6:amd64 libgeoip1 libgettextpo0:amd64 libgomp1:amd64 libgssglue1:amd64 libisc84 libisccc80 libisccfg82 liblockfile-bin liblockfile1:amd64 libltdl7:amd64 liblwres80 libmagic1:amd64 libodbc1:amd64 libpaper1:amd64 libpcap0.8:amd64 libperl5.14 libpipeline1:amd64 libpopt0:amd64 libsensors4:amd64 libsnmp-base libsnmp15 libsysfs2:amd64 libtalloc2:amd64 libtdb1:amd64 libtirpc1:amd64 libunistring0:amd64 libwbclient0:amd64 libxml2:amd64 locales-all logrotate lynx lynx-cur m4 make man-db manpages memtester mlocate mtools ncurses-term odbcinst odbcinst1debian2:amd64 openssl openssl-blacklist procmail psutils pwgen rmail rpcbind rsync sasl2-bin screen sendmail sendmail-base sendmail-bin sendmail-cf sendmail-doc sensible-mda sharutils snmp ssl-cert sudo syslinux syslinux-common tcpdump tcsh telnet tofrodos traceroute ttf-dejavu ttf-dejavu-core ttf-dejavu-extra ttf-freefont unixodbc unzip update-inetd uuid-runtime whois wide-dhcpv6-client xinetd; apt-get clean; apt-get remove --purge -y sendmail-base Debian 8 64-Bit Debian 8 64-bit users need to login to their VPS SSH and type in this command: DEBIAN_FRONTEND=noninteractive apt-get remove --purge -y -o Dpkg::Options::="--force-confdef" -o Dpkg::Options::="--force-confold" apache2 apache2-bin apache2-data apache2-doc apache2-mpm-prefork apache2-utils apt-utils bind9 bind9-host bind9utils binutils bsd-mailx bsdmainutils bzip2 ca-certificates cifs-utils console-common console-data cracklib-runtime cron db-util db5.3-util debconf-utils dh-python dialog expat fetchmail file finger fontconfig fontconfig-config fonts-dejavu fonts-dejavu-core fonts-dejavu-extra fonts-freefont-ttf ftp gettext groff-base info iputils-arping iputils-tracepath isc-dhcp-client isc-dhcp-common kbd ldap-utils less libapr1:amd64 libaprutil1:amd64 libaprutil1-dbd-sqlite3:amd64 libaprutil1-ldap:amd64 libapt-inst1.5:amd64 libasn1-8-heimdal:amd64 libavahi-client3:amd64 libavahi-common-data:amd64 libavahi-common3:amd64 libbind9-90 libcap-ng0:amd64 libcrack2:amd64 libcroco3:amd64 libcups2:amd64 libdns-export100 libdns100 libfile-copy-recursive-perl libfontconfig1:amd64 libfreetype6:amd64 libgeoip1:amd64 libglib2.0-0:amd64 libgomp1:amd64 libgssapi3-heimdal:amd64 libhcrypto4-heimdal:amd64 libhdb9-heimdal:amd64 libheimbase1-heimdal:amd64 libheimntlm0-heimdal:amd64 libhx509-5-heimdal:amd64 libirs-export91 libisc-export95 libisc95 libisccc90 libisccfg-export90 libisccfg90 libkdc2-heimdal:amd64 libkrb5-26-heimdal:amd64 libldb1:amd64 liblockfile-bin liblockfile1:amd64 libltdl7:amd64 liblua5.1-0:amd64 liblwres90 libmagic1:amd64 libmpdec2:amd64 libntdb1:amd64 libodbc1:amd64 libpaper1:amd64 libpcap0.8:amd64 libpci3:amd64 libperl5.20 libpipeline1:amd64 libpng12-0:amd64 libpopt0:amd64 libpython2.7:amd64 libpython3-stdlib:amd64 libpython3.4-stdlib:amd64 libroken18-heimdal:amd64 libsensors4:amd64 libsnmp-base libsnmp30:amd64 libtalloc2:amd64 libtdb1:amd64 libtevent0:amd64 libunistring0:amd64 libwbclient0:amd64 libwind0-heimdal:amd64 libxml2:amd64 logrotate lynx lynx-cur m4 make man-db manpages memtester mlocate mtools ncurses-term odbcinst odbcinst1debian2:amd64 openssl openssl-blacklist patch postfix procmail psutils pwgen python-crypto python-dnspython python-ldb python-ntdb python-samba python-talloc python-tdb python3 python3-minimal python3.4 rpcbind rsync samba-common samba-common-bin samba-dsdb-modules samba-libs:amd64 sasl2-bin screen sharutils snmp ssl-cert sudo syslinux tcpdump tcsh tdb-tools telnet tofrodos traceroute ttf-dejavu ttf-dejavu-core ttf-dejavu-extra ttf-freefont unixodbc unzip update-inetd uuid-runtime whois wide-dhcpv6-client xinetd Ubuntu 12.04 64-Bit Those that use Ubuntu 12.04 64-bit, need to login to their VPS SSH and execute the following: DEBIAN_FRONTEND=noninteractive apt-get remove --purge -y -o Dpkg::Options::="--force-confdef" -o Dpkg::Options::="--force-confold" apache2 apache2-doc apache2-mpm-prefork apache2-utils apache2.2-bin apache2.2-common apt-utils bind9 bind9-host bind9utils binutils bsd-mailx bsdmainutils bzip2 ca-certificates console-common console-data console-tools console-tools-dev cracklib-runtime cron db-util db5.1-util debconf-utils defoma expat fetchmail file finger fontconfig fontconfig-config ftp gettext groff-base info install-info iputils-arping iputils-tracepath isc-dhcp-client isc-dhcp-common klogd ldap-utils less libapr1 libaprutil1 libaprutil1-dbd-sqlite3 libaprutil1-ldap libapt-inst1.4 libavahi-client3 libavahi-common-data libavahi-common3 libbind9-80 libcap2 libclass-isa-perl libconsole libcrack2 libcroco3 libcups2 libdb4.8 libdns81 libfile-copy-recursive-perl libfontconfig1 libfreetype6 libgdbm3 libgeoip1 libgettextpo0 libgomp1 libgssglue1 libisc83 libisccc80 libisccfg82 liblockfile-bin liblockfile1 libltdl7 liblwres80 libmagic1 libnewt0.52 libodbc1 libpaper1 libpcap0.8 libperl5.14 libpipeline1 libpopt0 libsensors4 libsnmp-base libsnmp15 libswitch-perl libsysfs2 libtalloc2 libtdb1 libtirpc1 libunistring0 libwbclient0 libxml2 logrotate lynx lynx-cur m4 make man-db manpages memtester mlocate mtools ncurses-term odbcinst odbcinst1debian2 openssl openssl-blacklist perl perl-modules procmail psutils pwgen rmail rpcbind rsync sasl2-bin screen sendmail sendmail-base sendmail-bin sendmail-cf sendmail-doc sensible-mda sharutils snmp ssl-cert sudo sysklogd syslinux syslinux-common tcpdump tcsh telnet tofrodos traceroute ttf-dejavu ttf-dejavu-core ttf-dejavu-extra ttf-freefont unixodbc unzip update-inetd uuid-runtime whiptail whois wide-dhcpv6-client xinetd; apt-get clean Ubuntu 14.04 64-Bit On Ubuntu 14.04 64-bit, login to the VPS SSH and write in this command: DEBIAN_FRONTEND=noninteractive apt-get remove --purge -y -o Dpkg::Options::="--force-confdef" -o Dpkg::Options::="--force-confold" apache2 apache2-bin apache2-data apache2-doc apache2-mpm-prefork apache2-utils apt-utils bind9 bind9-host bind9utils binutils bsd-mailx bsdmainutils bzip2 ca-certificates console-common console-data console-setup cracklib-runtime cron db-util db5.3-util debconf-utils dialog expat fetchmail file finger fontconfig fontconfig-config fonts-dejavu fonts-dejavu-core fonts-dejavu-extra fonts-freefont-ttf ftp gettext groff-base info iputils-arping iputils-tracepath isc-dhcp-client isc-dhcp-common kbd keyboard-configuration ldap-utils less libapr1:amd64 libaprutil1:amd64 libaprutil1-dbd-sqlite3:amd64 libaprutil1-ldap:amd64 libapt-inst1.5:amd64 libavahi-client3:amd64 libavahi-common-data:amd64 libavahi-common3:amd64 libbind9-90 libbsd0:amd64 libcrack2:amd64 libcroco3:amd64 libcups2:amd64 libdns100 libfile-copy-recursive-perl libfontconfig1:amd64 libfreetype6:amd64 libgeoip1:amd64 libglib2.0-0:amd64 libgmp10:amd64 libgomp1:amd64 libgssglue1:amd64 libhdb9-heimdal:amd64 libisc95 libisccc90 libisccfg90 libkdc2-heimdal:amd64 libldb1:amd64 liblockfile-bin liblockfile1:amd64 libltdl7:amd64 liblwres90 libmagic1:amd64 libntdb1:amd64 libodbc1:amd64 libpaper1:amd64 libpcap0.8:amd64 libperl5.18 libpipeline1:amd64 libpopt0:amd64 libpython-stdlib:amd64 libsensors4:amd64 libsnmp-base libsnmp30:amd64 libtalloc2:amd64 libtdb1:amd64 libtevent0:amd64 libtirpc1:amd64 libunistring0:amd64 libwbclient0:amd64 libxml2:amd64 logrotate lynx lynx-cur m4 make man-db manpages memtester mlocate mtools ncurses-term odbcinst odbcinst1debian2:amd64 openssl openssl-blacklist postfix procmail psutils pwgen python python-crypto python-dnspython python-ldb python-minimal python-ntdb python-talloc python-tdb python2.7 python2.7-minimal rpcbind rsync sasl2-bin screen sharutils snmp ssl-cert sudo syslinux syslinux-common tcpdump tcsh tdb-tools telnet tofrodos traceroute ttf-dejavu ttf-dejavu-core ttf-dejavu-extra ttf-freefont unixodbc unzip update-inetd uuid-runtime whois wide-dhcpv6-client xinetd xkb-data; apt-get clean Ubuntu 15.04 64-Bit If you use Ubuntu 15.04 64-bit, login to your VPS SSH and use: DEBIAN_FRONTEND=noninteractive apt-get remove --purge -y -o Dpkg::Options::="--force-confdef" -o Dpkg::Options::="--force-confold" apache2 apache2-bin apache2-data apache2-doc apache2-mpm-prefork apache2-utils apt-utils bind9 bind9-host bind9utils binutils bsd-mailx bsdmainutils bsdutils bzip2 ca-certificates cifs-utils console-common console-data console-setup console-setup-linux cracklib-runtime cron db-util db5.3-util debconf-utils dialog expat fetchmail file finger fontconfig fontconfig-config fonts-dejavu fonts-dejavu-core fonts-dejavu-extra fonts-freefont-ttf ftp gettext groff-base info iputils-arping iputils-tracepath isc-dhcp-client isc-dhcp-common kbd keyboard-configuration ldap-utils less libapr1:amd64 libaprutil1:amd64 libaprutil1-dbd-sqlite3:amd64 libaprutil1-ldap:amd64 libapt-inst1.5:amd64 libavahi-client3:amd64 libavahi-common-data:amd64 libavahi-common3:amd64 libbind9-90 libbsd0:amd64 libcrack2:amd64 libcroco3:amd64 libcups2:amd64 libdns-export100 libdns100 libfile-copy-recursive-perl libfontconfig1:amd64 libfreetype6:amd64 libgeoip1:amd64 libglib2.0-0:amd64 libgomp1:amd64 libhdb9-heimdal:amd64 libicu52:amd64 libirs-export91 libisc-export95 libisc95 libisccc90 libisccfg-export90 libisccfg90 libkdc2-heimdal:amd64 libldb1:amd64 liblockfile-bin liblockfile1:amd64 libltdl7:amd64 liblua5.1-0:amd64 liblwres90 libmagic1:amd64 libntdb1:amd64 libodbc1:amd64 libpaper1:amd64 libpcap0.8:amd64 libperl5.20 libpipeline1:amd64 libpopt0:amd64 libpython-stdlib:amd64 libsensors4:amd64 libsnmp-base libsnmp30:amd64 libtalloc2:amd64 libtdb1:amd64 libtevent0:amd64 libtirpc1:amd64 libunistring0:amd64 libwbclient0:amd64 libxml2:amd64 logrotate lynx lynx-cur m4 make man-db manpages memtester mlocate mtools ncurses-term odbcinst odbcinst1debian2:amd64 openssl openssl-blacklist patch postfix procmail psutils pwgen python python-crypto python-dnspython python-ldb python-minimal python-ntdb python-samba python-talloc python-tdb python2.7 python2.7-minimal rpcbind rsync samba-common samba-common-bin samba-dsdb-modules samba-libs:amd64 sasl2-bin screen sharutils snmp ssl-cert sudo syslinux tcpdump tcsh tdb-tools telnet tofrodos traceroute ttf-dejavu ttf-dejavu-core ttf-dejavu-extra ttf-freefont unixodbc unzip update-inetd uuid-runtime whois wide-dhcpv6-client xinetd xkb-data Ubuntu 16.04 64-Bit For Ubuntu 16.04 64-bit operating system, login to your VPS SSH and complete as follows: DEBIAN_FRONTEND=noninteractive apt-get remove --purge -y -o Dpkg::Options::="--force-confdef" -o Dpkg::Options::="--force-confold" apache2 apache2-bin apache2-data apache2-doc apache2-utils bind9 bind9-host bind9utils libbind9-140 bind9-host bind9utils binutils bsd-mailx bsdmainutils bzip2 ca-certificates console-data cracklib-runtime cron db-util db5.3-util debconf-utils dialog expat libexpat1 fetchmail file libfile-copy-recursive-perl liblockfile-bin liblockfile1 finger fontconfig fontconfig-config libfontconfig1 fontconfig-config fonts-dejavu fonts-dejavu-core fonts-dejavu-extra fonts-dejavu-core fonts-dejavu-extra fonts-freefont-ttf ftp gettext gettext-base liblocale-gettext-perl groff-base distro-info-data info install-info procinfo iputils-arping iputils-tracepath isc-dhcp-client isc-dhcp-common ldap-utils less libfile-copy-recursive-perl liblockfile-bin libsnmp-base logrotate lynx lynx-common m4 make makedev man-db manpages memtester mlocate mtools odbcinst odbcinst1debian2 libgnutls-openssl27 openssl openssl-blacklist openssl-blacklist postfix procmail psutils pwgen dh-python libpython-stdlib libpython2.7 libpython2.7-minimal libpython2.7-stdlib libpython3-stdlib libpython3.5 libpython3.5-minimal libpython3.5-stdlib python python-crypto python-dnspython python-ldb python-minimal python-samba python-talloc python-tdb python2.7 python2.7-minimal python3 python3-minimal python3.5 python3.5-minimal python-crypto python-dnspython python-ldb python-minimal python-talloc python-tdb libpython2.7 libpython2.7-minimal libpython2.7-stdlib python2.7 python2.7-minimal libpython2.7-minimal python2.7-minimal rpcbind rsync sasl2-bin screen sharutils libsnmp-base libsnmp30 snmp ssl-cert sudo syslinux tcpdump tcsh tdb-tools telnet tofrodos traceroute ttf-dejavu ttf-dejavu-core ttf-dejavu-extra ttf-dejavu-core ttf-dejavu-extra ttf-freefont unixodbc unzip update-inetd uuid-runtime whois wide-dhcpv6-client xinetd; apt-get clean OpenSuse 13.1 64-Bit If you own an openSuse 13.1 64-bit operating system, login to your VPS SSH and execute: for i in SuSEfirewall2* aaa_base* adjtimex* apache2* aspell* autoyast2* bind* binutils* branding* bundle* ca* cantarell* checkmedia* cifs* command* cryptsetup* cups* curl* dconf* dhcp* dmraid* fetchmail* finger* fontconfig* gd* ghostscript* gio* glib* glib2* groff* gsettings* hwinfo* initviocons* keyutils* kpartx* less* libICE6* libSM6* libX11* libXau6* libXext6* libXmuu1* libXpm4* libXt6* libaio1* libapr* libapr1* libarchive13* libaspell15* libavahi* libdcerpc* libdcerpc0* libdconf1* libelf0* libenca0* libevent* libfam0* libffi4* libfreetype6* libgdbm4* libgensec0* libgio* libglib* libgmodule* libgnutls28* libgobject* libguess1-1.1-2.1.2.x86_64* libhogweed2* libicu51_2* libjasper1* libjavascriptcoregtk* libjbig2* libjpeg8* libldapcpp1* libldb1* liblua5_2* libmowgli2* libmysqlclient18* libndr* libndr0* libnetapi0* libnetpbm11* libnettle4* libp11* libparted0* libpcap1* libpci3* libpdb0* libpipeline1* libpng16* libpython2_7* librcc0* librcd0* libregistry0* libreiserfs* libsamba* libsamdb0* libsensors4* libsmbclient* libsmbclient0* libsmbconf0* libsmbldap0* libsmi* libsmi2* libsnmp30* libsoup* libsqlite3* libstorage* libstorage4* libtalloc2* libtasn1* libtdb1* libtevent* libtevent0* libtiff5* libtirpc1* libtranslate0* libwbclient0* libx86emu1* libxcb1* libyaml* libyui* libyui5* lsscsi* lvm2* lynx* m4* mailx* make* man* mdadm* mlocate* module* mtools* multipath* ncftp* ncurses* netcfg* netpbm* nfs* nfsidmap* openSUSE* openslp* p11* parted* pciutils* pkg* procmail* psmisc* psutils* pytalloc* python* rcc* release* rpcbind* rsync* ruby* ruby20* rubygem* samba* scout* screen* sendmail* shared* sharutils* snmp* sudo* syslinux* tcpdump* tcsh* telnet* time* timezone* traceroute* unzip* vim* wallpaper* which* words* xauth* xdg* xinetd* xli* yast2*; do zypper --non-interactive remove -n $i; done; zypper cc --all 3. Restart VPS Note: Some operating systems (openSuse 13.01 and CentOS 7) will require you to wait for upgrade process finish in order to execute OS minimalization command. Have any difficulties following these instructions? Got additional questions about making standard OpenVZ OS image minimal? Let us know! Our customer support team is ready to help 24/7.
-
Let’s Encrypt is a free, automated, and open certificate authority (CA), run for the public’s benefit. Let’s Encrypt is a service provided by the Internet Security Research Group (ISRG). In this tutorial, you will find out how you can benefit from these certificates by providing security for your Webmin websites. The tutorial was prepared with our "Webmin 1.9 with CentOS 7" template and is meant to work on our self-managed virtual private servers. 0. Preliminary requirements: "Webmin 1.9 with CentOS 7" template installed on the server; Fully updates server software (yum update); "Git" package installed (yum install git -y). 1. Downloading "Let's encrypt" client: git clone https://github.com/letsencrypt/letsencrypt /opt/letsencrypt 2. Installing the necessary Python module: yum install python-argparse -y 3. Adding additional name server For "Let's Encrypt" certificates to work properly we have to add "localhost" nameserver. We do so by going to "Webmin" control panel > "Networking" > "Network Configuration" > "Hostname and DNS Client" and adding "127.0.0.1" as additional name server: 4. Enabling SSL feature Also for certificate function to be active for your virtual servers we have to enable it in the "Virtualmin" control panel". We have to open "System Settings" > "Features and Plugins" and after checking "SSL website" save settings: 5. Installing "Let's encrypt" certificate For a new "Virtual server": Open "Server Configuration" > "SSL Certificate" > "Let's Encrypt" and press button "Request Certificate": For existing "Virtual server": Before proceeding with the certificate installation we have to enable the "SSL website feature". Open "Edit Virtual Server" > "Enable features" check "SSL website enabled?" and save. Then proceed with the step above.
-
DirectAdmin is one of the several control panels that allow using multiple PHP versions. In that way, you can support website software on the same server that requires different PHP versions. In order to use DirectAdmin multi PHP function, you need to have a CustomBuild and in this tutorial, CustomBuild 2.0 version will be installed. CustomBuild 2.0 only supports php 5.3 and higher. 0. Preliminary requirements DirectAdmin using CentOS 6 or CentOS 7 1. Connect to your server via SSH. 2. Install the required services using the command bellow: yum install wget gcc gcc-c++ flex bison make bind bind-libs bind-utils openssl openssl-devel perl quota libaio \ libcom_err-devel libcurl-devel gd zlib-devel zip unzip libcap-devel cronie bzip2 cyrus-sasl-devel perl-ExtUtils-Embed \ autoconf automake libtool which patch mailx bzip2-devel lsof db4-devel psmisc net-tools systemd-devel libdb-devel perl-DBI xfsprogs rsyslog logrotate crontabs 3. Update the CustomBuild version: * Go to DirectAdmin folder: cd /usr/local/directadmin * Move the file here: mv custombuild custombuild_1.x * Install the file: wget -O custombuild.tar.gz http://files.directadmin.com/services/custombuild/2.0/custombuild.tar.gz * Extract the file: tar xvzf custombuild.tar.gz * Go to CustomBuild folder: cd custombuild * Run CustomBuild: ./build 4. Change the CustomBuild configuration for it to allow several PHP versions. It can be done by changing the "options.conf" file or using SSH and command line. While you still are in the CustomBuild folder, change the required options: ./build set php1_mode php-fpm ./build set php2_mode php-fpm ./build set php1_release 7.0 ./build set php2_release 5.6 The php-fpm mode change is required if you are using Nginx and Apache as a reverse proxy. 5. Open the "options.conf" file: vi options.conf Check if the lines are as seen bellow: php1_release=7.0 php1_mode=php-fpm php2_release=5.6 php2_mode=php-fpm 6. Recompile PHP (it will take a while): ./build php n 7. Update the configuration: ./build rewrite_confs 8. Now you will be able to change the PHP versions for each domain inside the DirectAdmin control panel. By default, all the websites on your control panel will be using the "php1_release" set PHP version. If you want to change the PHP version for the specific website, login into your DirectAdmin control panel, press on the "User Level" and select the domain. Then click on "Domain Setup" and on the bottom, you will see a possibility to select the wanted PHP version.
-
ConfigServer Firewall (CSF) is a firewall configuration script that provides your server's security while giving you an advanced, easy to use interface for managing firewall settings. You can easily install it to your server via SSH and later manage it via WHM. Installation Login to your server via SSH (using terminal) as root and execute further commands: wget https://download.configserver.com/csf.tgz tar -xzf csf.tgz cd csf sh install.sh Usage The firewall is installed through the terminal, but configuration and use are still available on the WHM platform. In WHM Search enter 'ConfigServer Security & Firewall' and select it in the menu on the left. Firewall Configuration Be sure to disable the test mode. At first, the Firewall Status will be in Test Mode. At certain intervals, cPanel will run a periodic task (cronjob) that will reset your configuration. After finishing the configuration, the test mode needs to be disabled, otherwise, the changes will be lost. There are a lot of different settings on this page. For example, IPv4 Port Settings allow incoming and outgoing traffic to the server via TCP, UDP, ICMP, and other ports. Let's say you need MySQL to be able to receive remote connection. So you need to add 3306 port in TCP_IN row. Or let's say you need some applications on the server to perform queries in the remote server, so we're going to include this 3306 port in TCP_OUT row. Ports are separated by commas. Changes are saved at the bottom of the page. After changes are saved, you need to restart both csf and lfd. If the firewall on the server is in full and not the test mode, you will see a message: This is just one of the configuration options. All other features are described in the Firewall Configuration page, and changes are made the same as in the example described before. Check server security This is a handy tool that shows your server's security level. By default, the server is not protected at the recommended level: For your safety, you can use the tips on this page. When making changes, be careful not to interfere with applications running on the server. Allow/deny IP addresses Quick Allow means that the IP here will be allowed to perform any task on your server (any incoming traffic, any port, etc). It's a whitelist. Quick Deny is an opposite list. You can, for example, place the IP addresses that performed DDoS attacks for your server there. It's a blacklist. Quick Unblock is used if the IP address was blocked by an accident. You can unblock it with this feature. Check for IPs in RBLs This tool will check every IP address in your server for any public blacklists. Take note that it takes some time to complete. We have reviewed some of the key features of CSF. However, there are many more, so we recommend that you explore the features of this tool yourself and tailor them to your server's needs.
-
There are various ways to optimize your server. One of them is to use a LiteSpeed Web Server - high performance and scalability web server that has many features, which are designed to strengthen your web hosting infrastructure. In this tutorial, we explain how you can install the LiteSpeed Web server and use one of its features - LiteSpeed Cache plugin (LSCWP), which will improve the performance of the WordPress sites hosted on your server. Installation LiteSpeed Web Server WHM Plugin can be installed on your server via SSH. The installation commands are listed below: cd /usr/src wget http://www.litespeedtech.com/packages/cpanel/lsws_whm_plugin_install.sh sh ./lsws_whm_plugin_install.sh After following these steps, you will need to connect to your server through WHM and complete the installation: LiteSpeed has a paid license. However, for one site, you can use the trial 'Free Starter' version. It is important to note that in order to have a free license, the server must not have more than 2 GB of RAM. After a successful installation, you should see the following result. Configuration If you want to have both Apache and LiteSpeed Web Server services running on the server at the same time, you will need to change port offset The ruid2 module is incompatible with LiteSpeed Web Server, so you would need to disable it. It can be done in EasyApache 4 settings. Also, some EasyApache PHP installation may be missing the timezoneDB extension, you should also resolve this: Finally, you will need to setup root cache. You will see this option after clicking Manage Cache Installations: By clicking you will be notified that server and/or Virtual Host cache root has not yet been set and have an option to make changes: Enabling LiteSpeed Cache After setting cache root, go back to the LiteSpeed manager and pick Manage Cache Installations again. You will then need to pick a LiteSpeed version you want to use: Finally, run the scan and enable LiteSpeed Cache to the available sites: Uninstall You can uninstall LiteSpeed Web Server via SSH: /usr/local/cpanel/whostmgr/docroot/cgi/lsws/lsws_whm_plugin_uninstall.sh
-
GitLab is git repository management with extensive features like code reviews, issue tracking, activity feeds, wikis, protected branches. This article will provide you the information on how to install GitLab on LCwHost Ltd servers. First, let us mention, that GitLab is officially available with CentOS 6/7, Ubuntu 14.04/16.04, Debian 7/8/9, OpenSUSE 42.2/42.3 versions. Here we will be covering only CentOS, Debian and Ubuntu, since these are the most common OS used among our VPS. It is recommended at least 4 GB of free memory (RAM + swap) to run GitLab. Also, let us clarify, that our OS templates comes with pre-installed web service (Apache) and has a default configuration. So before GitLab installation, we would recommend removing the Apache from your server: For Debian/Ubuntu: apt-get remove apache2 apache2-bin apache2-data apache2-doc apache2-mpm-prefork apache2-utils For CentOS: yum remove httpd httpd-tools Once you removed all the Apache related packages, you can actually proceed with GitLab. First you will need to install some repositories, which will be used to download and install GitLab. For Debian/Ubuntu: curl https://packages.gitlab.com/install/repositories/gitlab/gitlab-ce/script.deb.sh | sudo bash For CentOS: curl https://packages.gitlab.com/install/repositories/gitlab/gitlab-ce/script.rpm.sh | sudo bash After you add the required repositories, you can proceed with installation: For Debian/Ubuntu: sudo EXTERNAL_URL="http://your.subdomain.com" apt-get install gitlab-ee For CentOS: sudo EXTERNAL_URL="http://your.subdomain.com" yum -y install gitlab-ee Note. Change "http://your.subdomain.com" with your domain/subdomain, which will be used to open GitLab. The installation may take up to 5-7 minutes, but once it is done, you will be present with some huge image on your terminal about completion. After that you will have to go to your chosen URL (for example: http://your.subdomain.com) and change the password. The default username will be root, so you can log in to GitLab with this username and your newly changed password. Note. If you install the GitLab, without removing Apache first, you may need to configure virtual host, as you will most likely be displayed with default Apache webpage, when trying to connect to your chosen URL. More information on official site: https://about.gitlab.com/
-
In this guide we will be installing Kubernetes Master server, together with installing Kubernetes Node servers and connecting them to the Master server. Kubernetes is an open-source system for automating deployment, scaling, and management of containerized applications from a Master server instance. 0. Requirements: KVM Linux server running on Ubuntu 16.04 OS. 1. Preparing Your VPS For Installation Of Kubernetes: Both, Master server and Node servers has to be prepared with required packages. Firstly, update your package list (commands will be initiated as root. If done by other user, use "sudo"): apt-get update Afterwards, when the packages list are updates, proceed with installation of apt-transport-https package: apt-get install -y apt-transport-https Afterwards, install Docker that will be the container system for Kubernetes: apt install docker.io -y When the installation will be completed, start and enable Docker service: systemctl start docker && systemctl enable docker 2. Installation Of Kubernetes: Since the required packages and other instances have been installed, we can now proceed with installation of Kubernetes server. Firstly let's download and add the key for Kubernetes Installation: curl -s https://packages.cloud.google.com/apt/doc/apt-key.gpg | apt-key add Now let's create a file with your text editor (We will be using "nano" for this one, however you can use any other): nano /etc/apt/sources.list.d/kubernetes.list In the file enter the following line, save and close it: Now, let's install the Kubernetes with required packets: apt-get update && apt-get install -y kubelet kubeadm kubectl kubernetes-cni 3. Setting Up Kubernetes Master Server: The following command will setup the configuration files and boot up the whole Master server. sudo kubeadm init !!!Important!!!, do not close terminal after this command is completed, since you will receive your unique token key, which is required for Node server to connect. The setup will take about couple of minutes. Following command should be used as additional user with sudo rights: mkdir -p $HOME/.kube sudo cp -i /etc/kubernetes/admin.conf $HOME/.kube/config sudo chown $(id -u):$(id -g) $HOME/.kube/config The formed token with connection command should look like this: The token should be valid only for 24 hours. If you would like to add other nodes to your cluster after some time, new token can be generated with using kubeadm token generate 4. Connecting Node Server To Master: This is the easiest part. When you will have your Master server running, for your Node servers, repeat the "1. Preparing your VPS for installation of Kubernetes" and "2. Installation of Kubernetes" parts of this guide for general installation of Kubernetes. When the Node server will have Kubernetes installed, use the command that was generated for you at the end of Master node configuration: kubeadm join <master node IP>:6443 --token i5s534.38o26swycl0gd0gr --discovery-token-ca-cert-hash sha256:4b4c8d9652e925dffe0f28c73984c27d821cd998f63525dd45378a762517dea3 Instead of master node IP server will have generated your Master server's IP address so no additional adjustments will be required. If you will use your separately generated token, you should adjust the --token code to the one that will be generated for you. 5. Finishing Up The Setup: To check if everything was correct, from the Master node initiate the command kubectl get nodes Command results should look similar to: You can now set services for you cluster or scale it's size by adding additional servers to the cluster in the same way as you have added the first node. For more information on cluster management, loads of useful information is provided in the Kubernetes Documentation. Good luck with your cluster!
-
Introduction By default on Ubuntu the Apache2 web server stores its files in "/var/www/html" folder. Sometimes it’s helpful to move it to another location, such as a separate mounted file system and so on. In this tutorial you will learn how to move the default directory to a new location. We are using Ubuntu 16.04 for this tutorial, however you should be able to follow this guide using any of our offered Ubuntu or Debian distributions. Copying Files We are using "rsync" for coping files to a new location: rsync -av /var/www/html /new/location Where "-a" flag preserves the permissions and other directory properties and "-v" flag provides comprehensive output. Note: If you are using "Tab" completion be sure to delete trailing slash "/" on the the directory. Updating The Configuration File Now we need to update "000-default.conf" file: nano /etc/apache2/sites-enabled/000-default.conf Now we will find the line that begins with "DocumentRoot" and update it with the new location. It should look something like this: # The ServerName directive sets the request scheme, hostname and port that # the server uses to identify itself. This is used when creating # redirection URLs. In the context of virtual hosts, the ServerName # specifies what hostname must appear in the request's Host: header to # match this virtual host. For the default virtual host (this file) this # value is not decisive as it is used as a last resort host regardless. # However, you must set it for any further virtual host explicitly. #ServerName www.example.com ServerAdmin webmaster@localhost DocumentRoot /nauja/direktorija # Available loglevels: trace8, ..., trace1, debug, info, notice, warn, # error, crit, alert, emerg. # It is also possible to configure the loglevel for particular # modules, e.g. #LogLevel info ssl:warn ErrorLog ${APACHE_LOG_DIR}/error.log CustomLog ${APACHE_LOG_DIR}/access.log combined # For most configuration files from conf-available/, which are # enabled or disabled at a global level, it is possible to # include a line for only one particular virtual host. For example the # following line enables the CGI configuration for this host only # after it has been globally disabled with "a2disconf". #Include conf-available/serve-cgi-bin.conf # vim: syntax=apache ts=4 sw=4 sts=4 sr noet Restarting Apache Once you’ve finished the configuration changes, you can make sure the syntax is right with "configtest": apachectl configtest If everything is right you should get result: Syntax OK As long as you get Syntax OK, restart the web server. Otherwise, track down and fix the problems it reported. Use the following command to restart Apache: systemctl reload apache2 Conclusion That's it! You changed Apache's default folder and from know all your affected sites will be loaded from new location.
-
Introduction Memcached is a general-purpose distributed memory caching system. It is often used to speed up dynamic database-driven websites by caching data and objects in RAM to reduce the number of times an external data source (such as a database or API) must be read. Nearly every popular CMS has a plugin or module to take advantage of memcached, and many programming languages have a memcached library, including PHP, Perl, Ruby, and Python. Memcached runs in memory and is thus quite speedy, since it does not need to write data to disk. Installation We can install Memcached by running this command: apt-get install memcached -y Configuration Use the following command to edit the default configuration file /etc/memcached.conf: nano /etc/memcached.conf You will see default configurations of memcached, such as default port (11211), cap of memory for memcached in megabytes (64) and so on. Most common variables to edit: p - port in which memcached is running m - cap of memory for memcached c - value of maximum connections An example how should look configuration file if we want memcached to run on port 12345, to use 2 GB of RAM and have 1024 allowed maximum connections: # memcached default config file # 2003 - Jay Bonci # This configuration file is read by the start-memcached script provided as # part of the Debian GNU/Linux distribution. # Run memcached as a daemon. This command is implied, and is not needed for the # daemon to run. See the README.Debian that comes with this package for more # information. -d # Log memcached's output to /var/log/memcached logfile /var/log/memcached.log # Be verbose # -v # Be even more verbose (print client commands as well) # -vv # Start with a cap of 64 megs of memory. It's reasonable, and the daemon default # Note that the daemon will grow to this size, but does not start out holding this much # memory -m 2048 # Default connection port is 11211 -p 11211 # Run the daemon as root. The start-memcached will default to running as root if no # -u command is present in this config file -u memcache # Specify which IP address to listen on. The default is to listen on all IP addresses # This parameter is one of the only security measures that memcached has, so make sure # it's listening on a firewalled interface. -l 127.0.0.1 # Limit the number of simultaneous incoming connections. The daemon default is 1024 -c 1024 # Lock down all paged memory. Consult with the README and homepage before you do this # -k # Return error when memory is exhausted (rather than removing items) # -M # Maximize core file limit # -r Finalizing After we had configured mamached to work with parameters we want we can start it: service memcached start We can test is it working with commands service memcached status or pgrep memcached netstat -tulpn | grep :11211 Conclusion That's it! You had installed and configured basics of memcached. So, now you have very useful program which can do a lot to increase the server efficiency.
-
In this tutorial, you will learn on how to upgrade your operating system from CentOS 7 to AlmaLinux OS manually. As always, before making any changes to your VPS, you should make a backup of your VPS - save all the essential data. It will be a wise option if anything goes wrong. Steps: First of all, you need to update all the system packages and repositories: sudo yum update -y Then you need to reboot your VPS: sudo reboot You might be disconnected from your VPS, so you will need to connect to your VPS again. After that, you need to install the elevate-release package with this command: sudo yum install -y http://repo.almalinux.org/elevate/elevate-release-latest-el7.noarch.rpm After the installation is completed, the output should look something like this: The next step is to install leapp-data-almalinux package: sudo yum install -y leapp-upgrade leapp-data-almalinux Then, you need to initiate a pre-upgrade check. Down below provided command runs the checks to see if the upgrade will be successful or not and provides a report of possible remediations: sudo leapp preupgrade If due to some reason the test fails, all the reasons will be saved in a file that path is /var/log/leapp/answerfile. If pre-upgrade is successful, you will need to run these commands: sudo rmmod pata_acpi echo PermitRootLogin yes | sudo tee -a /etc/ssh/sshd_config sudo leapp answer --section remove_pam_pkcs11_module_check.confirm=True Now, you can run the following command to migrate your OS from CentOS 7 to AlmaLinux: sudo leapp upgrade It might take up some time, so be patient. Then reboot your VPS again: sudo reboot It might take up to 20-30 minutes; meanwhile, the server will not be accessible via SSH. Do not worry, you can try to access your VPS via Emergency Console and watch how the files are installing. When the installation is completed, you will be asked to log in. So then you can try to connect to your VPS as root. Once you log in to your VPS, you can run this command to check your OS version: cat /etc/redhat-release If AlmaLiux was installed, you should see a similar output: And that's it, you have upgraded your OS successfully to AlmaLinux!


-
Introduction Node.js is a Javascript platform for server-side programming that allows users to build network applications quickly. By leveraging Javascript on both the front-end and the back-end, development can be more consistent and be designed within the same system. For as popular as this JavaScript run-time has become, you might be surprised to find out that it actually still isn't very easy to install Node.js on Ubuntu and other Linux distributions. It's still more of a manual process than it should be. In this guide, we'll show you 3 ways how to get started with Node.js on an Ubuntu/Debian server. Note: Tutorial on how to set up a Node.js application for production is on the way and will be released in few weeks. 1. Distro-Stable Version Ubuntu/Debian contains a version of Node.js in its default repositories that can be used to easily provide a consistent experience across multiple servers. Usually it will not be the latest version, but it should be quite stable. In order to get this version, we just have to use the apt package manager: sudo apt-get install nodejs If the package in the repositories suits your needs, this is all that you need to do to get set up with Node.js. In most cases, you'll also want to also install npm, which is the Node.js package manager. You can do this by typing: sudo apt-get install npm This will allow you to easily install modules and packages to use with Node.js. 2. PPA (Personal Package Archive) An alternative that can get you a more recent version of Node.js is to add a PPA maintained by NodeSource. This will probably have more up-to-date versions of Node.js than the official Ubuntu repositories. First, you need to install the PPA in order to get access to its contents. curl -sL https://deb.nodesource.com/setup | sudo bash - Note: If you got error "-bash: curl: command not found" it means you do not have curl installed on your server. You can install it with command: sudo apt-get install curl -y The PPA will be added to your configuration and your local package cache will be updated automatically. After running the setup script from nodesource, you can install the Node.js package in the same way that you did above: sudo apt-get install nodejs 3. NVM (Node.js Version Manager) Using NVM, you can install multiple, self-contained versions of Node.js which will allow you to control your environment easier. It will give you on-demand access to the newest versions of Node.js, but will also allow you to target previous releases that your app may depend on. First of all we need to get the software packaged from Ubuntu/Debian repositories: sudo apt-get install build-essential libssl-dev Once the prerequisite packages are installed, you can pull down the NVM installation script from the project's GitHub page: https://github.com/creationix/nvm Execute command: curl -o- https://raw.githubusercontent.com/creationix/nvm/v0.31.1/install.sh | bash This will download the script and run it. It will install the software into a subdirectory of your home directory at /.nvm. It will also add the necessary lines to your /.profile file to use the file. To gain access to the nvm functionality, you'll need to log out and log back in again, or you can source the /.profile file so that your current session knows about the changes: source ~/.profile Now that you have nvm installed, you can install isolated Node.js versions. To find out the versions of Node.js that are available for installation, you can type: nvm ls-remote As you can see, the newest version at the time of this writing is v6.2.0. You can install that by typing: nvm install 6.2.0 Usually, nvm will switch to use the most recently installed version. You can explicitly tell nvm to use the version we just downloaded by typing: nvm use 6.2.0 When you install Node.js using nvm, the executable is called node. You can see the version currently being used by the shell by typing: node -v Conclusion And that's it, you're done! Regardless of whatever installation method you used, you should run node -v to verify the build/install worked correctly.